Showing posts with label quick. Show all posts

Wednesday, August 17, 2016

Quick Mix Slice

Domesblissity quick mix slice

If you want to bake something in a hurry, you can’t go past this Quick Mix Slice. You can make it as fancy as you like with whatever ingredients you have. I just happened to have a few macadamia nuts in the pantry and the last bit of white chocolate which I melted and topped the slice with. It was so good.

Domesblissity Day to Day Cookery Quick Mix Slice

I’ve got all the fancy cookbooks you can think of but the one I refer to most is my high school Home Economics cookbook “Day to Day Cookery”. It’s got all your basic recipes in it including one for this Quick Mix Slice. It’s seriously so, so easy. Melt and mix, just the way I like it. It’s very much like a cookie recipe but baked as a slice and cut into bars. 

Domesblissity quick mix slice

Just mix the dry ingredients together, crush the weetbix cereal bars into it, melt the butter and mix.

20160619_115023

You can create cookies if you like by taking small spoonfuls of mixture and squeezing them into cookie shapes on a baking sheet but the easiest way to cook this recipe is to press it into a slice pan 20x25cm.

20160619_123208

Bake for approximately 25 to 30 minutes or until golden brown.

20160620_155157

You can eat it like that or top it with icing or melted chocolate like I did. The flavour combinations are endless. This is a great recipe for using up all those bits and pieces you have lying in the pantry. Dried fruit, nuts, sprinkles, lollies/candy, chopped cookies or chocolate, chocolate chips can all be used in this wonderfully easy recipe.

Quick Mix Slice

A quick melt'n'mix slice that can be made in no time. A great recipe to use up all those bits and pieces lying in the pantry.
Prep Time 5 minutes
Cook Time 25 minutes
Total Time 30 minutes
Servings 18
Author Anne

Ingredients

  • 1 cup self raising flour
  • 1 cup coconut
  • 3 weetbix breakfast cereal bars crushed
  • 3/4 cup brown sugar
  • 125 gm butter melted

Instructions

  1. Mix dry ingredients together.
  2. Add any additional ingredients, eg roughly chopped macadamia nuts, dried fruit, chocolate chips etc
  3. Add melted butter and mix well.
  4. Press mixture into a 20x25cm slice pan lined with baking paper.
  5. Bake for approximately 25 to 30 minutes or until golden brown in a 180 deg C oven.
  6. Top with icing or melted chocolate.

Recipe Notes

Possible flavour combinations:
White chocolate and macadamia
Sultana, dried apricots, dried figs, other dried fruit
Chocolate chips or chunks
Lollies/candy
Nuts of any kind

quick mix slice pin

Monday, June 6, 2016

Glazed Doughnut Cake

Glazed

Don’t you just love it when you Google a recipe, give it a try and it’s perfect? I do but then I hate it when I lose it. As was the case with this so, so simple Glazed Doughnut Cake I found years ago and used to make it all the time. When I wanted to make it again just recently, do you think I could find it? Oh no! But I did and I want to share it here, for my own sake!

20160508_125949

If you love doughnuts, cinnamon and an easy recipe, then this is one for you. A soft spongy cake like dough smothered with a buttery, cinnamon mixtured, baked and then topped with a sweet sticky glaze. Just like a doughnut but made into a sheet cake. It’s suitable to freeze but it’s best eaten when it’s straight out of the oven, all bubbly and hot.

20160508_125941

This recipe does contain yeast but if you’ve never worked with yeast before, this is a good one to get started on. There’s nothing to it really. You only have to mix the yeast with warm milk, mix through the other ingredients, let sit for 15 minutes and then bake. No kneading required. I’m forever grateful for Nicole Weston from Baking Bites who I got the recipe from. It changed my world when I wanted to serve the children a hot doughnut treat without all the fuss of making doughnuts. 

20160508_113449

Mix the flour, sugar and salt together in a bowl.

20160508_113628

Mix together  yeast with warm milk. A box of yeast sachets is available in the baking aisle of the supermarket. You’ll need two sachets for this recipe.

20160508_113923

It will start to froth up. 

20160508_114120

Add the yeast/milk mixture and remaining ingredients to the flour, sugar and salt and mix together until a dough forms.

20160508_114409

Press this into a 20x25cm slice tin lined with baking paper and allow to ‘rest’ in a warm place for approximately 15 minutes.

20160508_120031

The yeast will be activated and it will puff up.

20160508_120332

While the dough is resting, melt butter and add cinnamon and brown sugar.

20160508_120439

Pour onto batter.

20160508_120516

With a knife, swirl the cinnamon/butter mixture all over the batter so it is mixed in.

20160508_125330

Bake for about 30 minutes. (I had mine on the bottom shelf of the oven so it browned a little too much on the bottom but it was still good to eat.)

20160508_125941

While still warm, pour over glaze. I coloured mine pink because the kids always seemed to like the pink glazed doughnuts when we buy them. Now that I’ve found one of my favourite all time recipes, there’s no need to buy doughnuts anymore. Eat while still warm. Be careful not to burn your mouth though. This is definitely a great one for winter mornings, perfect for breakfast and perfect to freeze for lunchboxes. The kids loved it. 

glazed-doughnut-cake

Glazed Doughnut Cake

A delicious glazed doughnut like cake that involves using yeast but is so easy to make.
Prep Time 30 minutes
Cook Time 30 minutes
Total Time 1 hour
Servings 18
Author Anne

Ingredients

Cake batter

  • 1.1/2 cups plain flour
  • 1/3 cup sugar
  • 1/4 tsp salt
  • 4 tsp dry yeast 2 sachets
  • 2/3 cup warm milk
  • 3 tbs vegetable oil
  • 1/2 tsp vanilla extract
  • 1 egg beaten

Cinnamon topping

  • 3 tbs butter melted
  • 3/4 cup brown sugar
  • 1 tsp ground cinnamon

Glaze

  • 1 cup icing sugar
  • 1-2 tbs milk
  • food colouring optional

Instructions

  1. Preheat oven to 170 deg C.
  2. Line a 20x25cm (8"x10") pan with baking paper.
  3. In a large bowl, combine flour, sugar and salt.
  4. Dissolve the yeast in a measuring cup filled with the warmed milk, then stir milk mixture, vegetable oil, vanilla extract and egg into the flour mixture.
  5. Mix well, until very smooth.
  6. Pour into prepared pan and let rest for 15 minutes.
  7. While the dough rests, mix together melted butter, brown sugar and cinnamon.
  8. Spread evenly on top of rested dough and swirl the mixture into the dough with a knife.
  9. Bake for about 30 minutes, until bread is lightly browned at the edges and the center of the bread springs back when lightly pressed. Some of the sugar mixture on top may still be bubbling.
  10. Mix the icing sugar and milk together to form an icing and drizzle it onto the bread.
  11. Serve warm.

Recipe Notes

Food colouring could be added to the icing mixture.

Adapted from Quick & Easy Cinnamon Bun Bread by Baking Bites

Monday, May 16, 2016

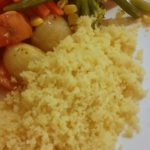
Quick & Easy Orange Couscous

orange couscous

We all like to go to pasta or rice as a side to most of our main meals but you really couldn’t find anything easier than couscous in particular a flavoured one like orange couscous.

20160427_191011

Instant couscous, which is what’s readily available at the supermarket has already been prepared, that is pre-steamed and dried semolina but it is quite a lengthly process if done by hand. Couscous is commonly used in North African cuisine like in regions of Morocco and some parts of the Middle East. It is also very similar to ‘grits’ in the USA. It can be used in both savoury and sweet dishes and perfect in a salad.

20160427_185419

It’s so easy to prepare. Just add 1 cup of couscous to a dish, heat the kettle and make up to 1 cup of liquid and pour over the couscous. Cover and let sit for about 5 minutes. I had 1 orange in the fridge so squeezed the juice into a jug and made up the rest of the liquid to 1 cup with just hot water. Once the couscous has absorbed all the liquid, fluff with a fork and add a slurp of olive oil or a knob of butter. Use as you would pasta or rice but it goes particularly well with Moroccan dishes like a tagine, stew or slow cooked dish.

orange-couscous-pin

Quick & Easy Orange Couscous

A delicious side to all types of dishes instead of pasta or rice. Particular nice with Moroccan or other North African cuisine dishes.
Prep Time 5 minutes
Cook Time 5 minutes
Total Time 10 minutes
Servings 6
Author Anne

Ingredients

  • 1 cup instant couscous
  • 1 cup liquid including any juices and flavours
  • 1 tbs olive oil or 1 tbs butter

Instructions

  1. Put couscous in a bowl.
  2. Add 1 cup of hot water including any flavouring like citrus juices, herbs or spices.
  3. Cover and let stand for 5 minutes.
  4. Fluff with a fork then add a tablespoon of olive oil or butter and stir through.
  5. Serve as required.

Tuesday, July 21, 2015

50 Quick Sew Cloth Napkins

Oh the dilemmas one faces when planning their own DIY wedding. If money wasn’t an option, there wouldn’t be a dilemma. Trouble is, we’ve decided on a budget and we’re sticking to it! I was faced with a dilemma recently when it came to deciding on the napkins/serviettes for the wedding. You see, we’re having both the ceremony and the reception at our home and I’m doing the appetisers and a caterer will supply the main meal. The caterer did supply paper napkins, which is a perfectly good option but I just kept thinking how much I would prefer cloth napkins. Searching the interwebs, the cheapest I could find were about $2 each, plus postage and when you add that up I’d be looking at $100 plus just so people could wipe their faces which to me, was ridiculous. I looked at various good quality paper napkins as well and I so much preferred cloth napkins. First world problems, I know!

I did, however, pick up a brand new double bed size sheet set from the thrift store for $10 and when I saw it I knew it would be perfect for decorating our wedding reception space. I’ve used it already for so many things and I have so much leftover. It’s a light cotton material and just perfect for napkins. I didn’t want to have to fold over the edges, press them and then sew. Too much effort for me. So I decided on this quick sew method.

I cut out a template from a cardboard box in the size I wanted. This is probably about 25cm (10 inches) square.

Using my cutting matter and rotary cutter, I doubled the material (if you’re keen you could fold it over again to reduce time but I think my blade is getting blunt) and I set about cutting 50 napkins.

It didn’t take that long.

After they were all cut, I gave them a wash in the washing machine and dried them so the edges would all be frayed.

I then sewed a line in a contrasting coloured thread around the edge of the napkin (about 1cm in) and neatened the edges to achieve that frayed look.

This did become quite tedious after a while and I’m still finding threads all over the house, the kids and the dogs. I’d got through about half and I decided to finish the other half off with the pinking shears. It doesn’t matter to me at the end of the day. They’ll be folded and only used to wipe your face.

If you count interruptions for getting sick myself, having sick children, a 2 week school holiday break and the usual interruptions that come with being a Mum, these didn’t take too long after all. I’ve given them all a press, ready for the wedding.

We currently use paper napkins at home with our usual meals but these will all come in handy after the wedding and help reduce the number of paper napkins we buy. If you count all the other crafting I’ve done using this sheet set and still have heaps of fabric left, I think these 50 napkins set me back a couple of dollars. A good saving after all.

You can check out my other budget wedding ideas I’ve done here.

Wednesday, August 3, 2011

Top 5 quick winter soups

Here we are, the first week of August and I can already feel Spring is in the air. Our days have been so warm, the nights are still cool so some time left to enjoy soups, stews and hot dishes. It won’t be long before I’ll be complaining about how hot it is to cook and having no appetite to eat.

I thought I’d share 5 of the soups I made this winter which are pretty versatile and just about anything you have lying around in the pantry, fridge or freezer could be used for these soups. Some croutons, thick crusty bread or grilled chopped bacon on top and you’ve got a pretty hearty meal.

1.  Asian Chicken & Corn Soup

1 chicken breast fillet
1 litre chicken stock
1 tin creamed corn
1/2 cup frozen corn niblets
1 tbs soy sauce
1/2 tsp ground ginger
1/2 tsp sesame oil
1 tsp onion flakes
salt & pepper
  1. Add chicken breast fillet, whole, to chicken stock.
  2. Poach until cooked. Remove and shred or dice chicken. Return to pan.
  3. Add creamed corn, frozen corn and remaining ingredients. Cook until frozen corn is cooked and serve.
  4. Garnish with chopped coriander, if desired.
Serves 4.

2.  Zuppa di Fagioli Rossi (Red Bean Soup)

1 can red kidney beans, drained and rinsed

1 can Italian diced tomatoes
3 cups stock (I used chicken)
1 tbs tomato paste
2 onions, diced
3 cloves garlic, crushed
2 carrots, peeled and diced
1 sweet potato, peeled and diced (I always use sweet potato in my stews and soups as a natural thickener)
2 cups cabbage, chopped
1 cup mushrooms, sliced
1 tbs dried basil
1 tsp dried oregano
salt & pepper
  1. Combine all ingredients.
  2. Slow cook on slow for 8 hours or on high for 4 hours. (Alternatively, simmer on stove top until carrots are tender, approx 20 mins.)
  3. Serve with grilled ciabatta or sour dough bread, grated parmesan and a spoonful of olive tapenade or pesto, if you have it.
  4. To finish, drizzle with a little olive oil.

Serves 4.

3.  Creamy Potato & Bacon Soup

3 medium sized potatoes, peeled and chopped

3 bacon rashers, chopped finely
2 small or 1 large onion, chopped finely
2 cups chicken stock
2 cups milk
2 tbs plain flour
salt and pepper
olive oil
  1. Fry onions and bacon in a small amount of olive oil.
  2. Add potatoes and cover with 2 cups of chicken stock. Boil under potatoes are tender. Add pepper and adjust salt, if required.
  3. Mash with a potato masher to your desired consistency, ie leave course for a chunkier soup or mash more until a smooth consistency.
  4. Blend 2 tbs plain flour with half a cup of milk to a smooth paste, top up milk to one cup, add to soup and add a further cup of milk. Stir until thickened.
  5. Serve with crusty bread.

Serves 4.

4.  Green Pea & Bacon Soup

1 cup dried split peas, rinsed
1-2 potatoes, peeled and diced
1-2 carrots, peeled and diced
2 stalks celery, diced finely
3-4 bacon bones
2 bay leaves
1 cup frozen green peas
enough chicken stock to cover
2 rashers bacon, diced

  1. Put dried peas, potatoes, carrots, celery, bacon bones and bay leaves in a saucepan and cover with sufficient chicken stock.
  2. Bring to the boil and reduce to a simmer until vegetables and peas are softened.
  3. Remove bacon bones. (If there is any meat on them, remove and add to the soup.)
  4. Add frozen peas and cook for a further 10 mins.
  5. Blend with a stick blender until the desired consistency.
  6. Fry bacon until crispy.
  7. Spoon soup into bowls and top with cooked bacon.

Serves 4.

5.  Smokin’ Lentil Soup

3-4 bacon bones

1 cup red lentils
2 cups pumpkin, peeled and chopped
1 medium onion, finely chopped
1 carrot, chopped
enough chicken stock to cover (I used water and chicken stock powder)
1 tbs sweet paprika (you could use a smoked paprika)
1 pinch dried thyme
pepper (adjust salt to taste at end of cooking as the bacon bones can be quite salty)
  1. Throw everything together in a pot.
  2. Bring to the boil, reduce heat and let simmer until carrots and lentils are soft (approx 45 mins).
  3. Remove bones. (There wasn’t enough meat on the bones to warrant adding to the soup.)
  4. For a smooth soup, blend or puree until smooth (I used my stick blender straight in the pot) or leave as is for a chunky version.
  5. Serve with crusty bread. (You could also serve with some fried, chopped bacon as a garnish. I just ran out of time.)
Serves 4.

Sunday, June 19, 2011

Quick Asian Chicken & Corn Soup

This is a great throw together, easy soup for a Sunday night, which is exactly what I did tonight. I was out all day at Mum’s celebrating my sister’s birthday and not really feeling like cooking, which is usual for a Sunday night. Although not exactly authentic because I omit the egg that’s usually added at the end for the ‘stringy’ effect, it’s still a tasty, warming soup.

Asian Chicken & Corn Soup

1 chicken breast fillet
1 litre chicken stock
1 tin creamed corn
1/2 cup frozen corn niblets
1 tbs soy sauce
1/2 tsp ground ginger
1/2 tsp sesame oil
1 tsp onion flakes
salt & pepper

Add chicken breast fillet, whole, to chicken stock. Poach until cooked. Remove and shred or dice chicken. Return to pan. Add creamed corn, frozen corn and remaining ingredients. Cook until frozen corn is cooked and serve. Garnish with chopped coriander, if desired.

Serves 4.

Friday, January 14, 2011

Quick Mix Chocolate Chunk Cookies

Quick Mix Chocolate Chunk Cookies

Another one of my favourites. Quick and easy. I love traditional baking, things like creaming the butter and sugar together etc but sometimes, with B and E wanting to help all the time, I’m all for quick and easy. This recipe was given to me by my fellow foody friend, Claire in Tasmania. A lovely crispy outer, chewy biscuit. I prefer to use block chocolate, cut into chunks rather than chocolate http://www.asianwomenforum.com/user__profile~logins_key__33143.html chips. If you’re going to have a chocolate chip cookie, you may as well be able to taste the chocolate, right?

Quick Mix Chocolate Chunk Cookies

3/4 cup brown sugar
1/2 cup caster sugar
1 1/2 cup SR flour
1/2 cup plain flour
185g butter – melted
1 egg
2 tsp vanilla
100gm chocolate, chopped

Preheat oven to 160 deg C.  Mix dry ingredients. Mix wet ingredients. Mix together. Bake for approx 15 mins or until golden. 

Another happy customer!

quick-mix-chocolate-chunk-cookies-pin