Showing posts with label mini. Show all posts

Monday, January 11, 2016

Mini Date Loaves

mini-date-loaves

I’ve been to my fair share of fetes, bake sales and markets and one of the first things I go for, besides fudge of course, is a date loaf. I don’t normally have dates in my pantry. Occasionally I’ll buy them but they’ll stay in there forever, unused. The trouble also with buying a whole ‘normal’ sized date loaf is that I’m usually the only one that eats it and even though I can cut it into slices and freeze it, it won’t get eaten for such a long time and I’ll forget about it. And also, how much date loaf can a girl really eat on her own? I wanted to contribute to my children’s school fete and decided to make smaller, individual date loaves using my mini loaf pan.

DSCF1097

Dates do last a long time in the pantry. They are so sweet and add a nearly caramel-like consistency and taste to baked goods. Some people like them, some people don’t. I do but in saying that I only like them used in sweet baked goods. I don’t like using dried fruit in savoury dishes.

DSCF1098

This recipe is very, very easy and it’s probably the one I’d use if I were to make individual Sticky Date Puddings. I’d probably use a Texas muffin sized pan.

DSCF1099

Don’t even get me started on the batter. It smells absolutely gorgeous and I have to try hard to resist not eating it all before being baked. This is such an easy recipe and makes a lovely light cake. This recipe deserves a place at any good bake sale as well as in lunch boxes or served for morning or afternoon tea.

DSCF1103

 
Don’t forget the butter!

Mini Date Loaves

A smaller version of the Date Loaf, beautifully moist and a lovely light cake. Can be made as a whole loaf or in muffin pans for Sticky Date Pudding.
Prep Time 10 minutes
Cook Time 25 minutes
Total Time 35 minutes
Servings 8
Author Anne

Ingredients

  • 1 cup dates chopped
  • 1 cup brown sugar lightly packed
  • 60 g butter
  • 1 cup boiling water
  • 1 3/4 cup self-raising flour
  • 1 tsp bicarbonate of soda
  • 2 tsp vanilla essence

Instructions

  1. Heat oven to 170 deg C (375 deg F).
  2. Mix chopped dates and sugar in a bowl and then add butter.
  3. Pour in boiling water, stirring until butter has melted completely.
  4. Add flour and then bicarbonate of soda, mixing well.
  5. Add vanilla.
  6. Bake in a greased (or lined) mini loaf pan approximately 25 minutes or until a skewer inserted comes out clean.

Recipe Notes

Suitable to freeze.
Can be made as a whole loaf.
Can be made in a Texas muffin pan and served with Caramel Sauce for a Sticky Date Pudding.

mini-date-loaves-pin

Monday, January 12, 2015

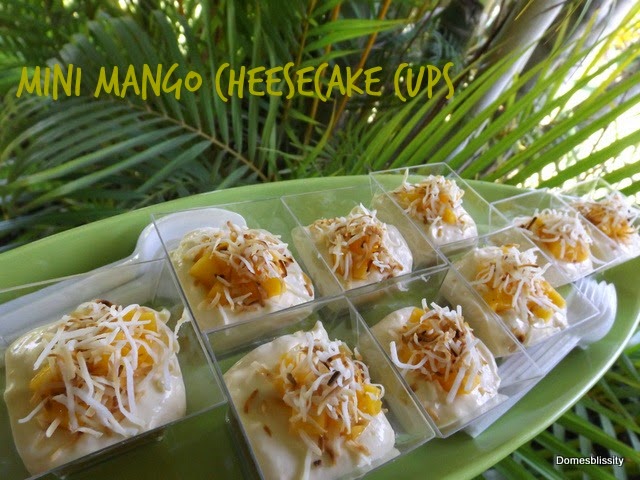
Mini Mango Cheesecake Cups

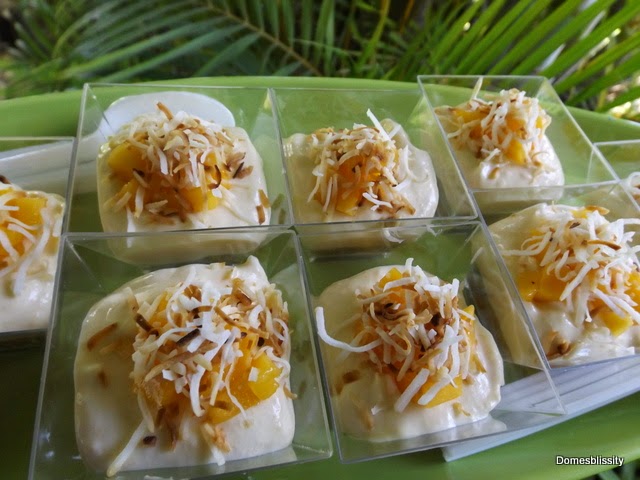
Remember the Mini Choc Hazelnut Cheesecake Cups I made just before Christmas when I had a few girlfriends over? Well, these are the other flavour I made. A plain mango cheesecake cup topped with toasted coconut. It was hard to choose which was the nicer but it all depends if you are a chocoholic or love the fresh taste of mango. I can’t begin to tell you how easy these are and great for a crowd and just a little taste for everyone instead of a whole, big cheesecake but with the same flavour.

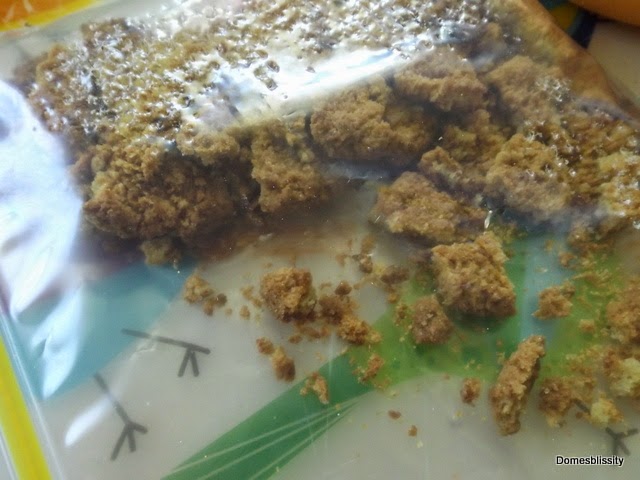
Begin by crushing some plain flavoured biscuits. These are called Butternut Snaps and are a crunchy, buttery biscuit.

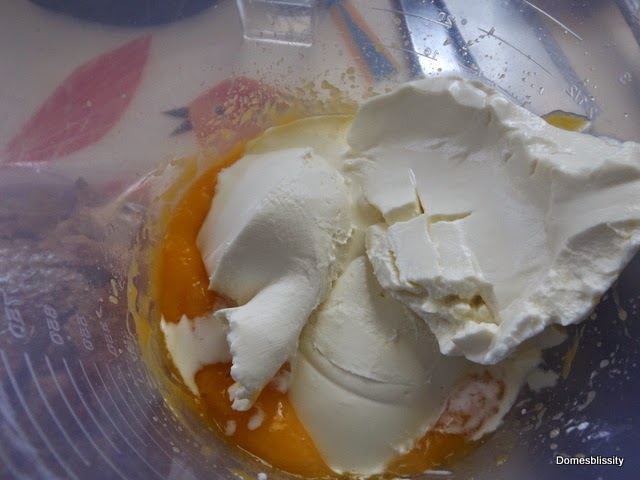
Using fresh, tinned or frozen mango, blitz until you have about 1/2 to 1 cup of mango puree. (You could also use tinned mango puree.) It’s mango season here where I live in Brisbane and the mangoes are in abundance. Mix in one 250gram tub of spreadable cream cheese.

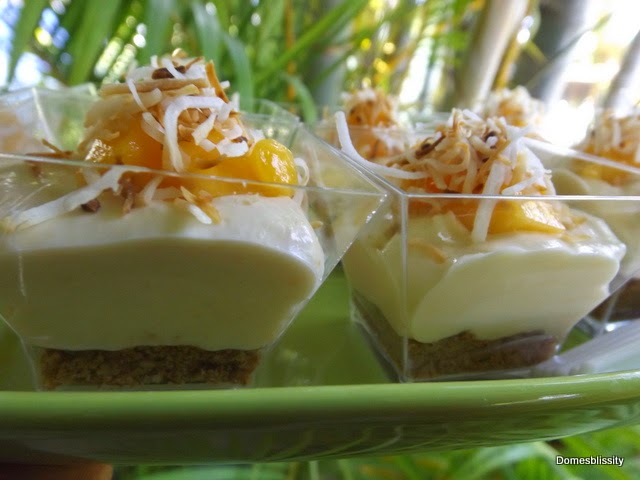
Spoon a tablespoon of biscuit crumbs into the bottom of a shot glass or small cup. (You can use bigger glasses if you like.) These plastic cups were about $2 for ten at my local dollar store. Spoon on the cheesecake mixture, top with a little finely diced fresh mango if you have it and sprinkle with a little toasted, shredded coconut. Pop in the fridge to set. That’s it!

No need to set with gelatine, they will firm up in the fridge just nicely and no need for a long list of ingredients. I can’t even begin to imagine all the different flavour combinations you could use. Just Google cheesecake and add those base ingredients to a tub of spreadable cream cheese. It really is that easy.

Mini Mango Cheesecake Cups

  • 6 crunchy butter based biscuits, crushed
  • 1 tub 250gm spreadable cream cheese
  • 1/2 fresh mango, pureed (or tinned/frozen equivalent, depending on how many cups you are making)
  • extra fresh diced mango for garnish
  • shredded coconut, toasted for garnish
  1. Spoon 1 tablespoon of crushed biscuits into the base of a shot glass or small plastic cup.
  2. Mix mango puree with cream cheese and spoon on top of biscuit crumbs.
  3. Top with a little diced fresh mango and toasted shredded coconut.
  4. Chill until ready to serve.

Makes 10 small cups.

Thursday, January 8, 2015

Mini Choc Hazelnut Cheesecake Cups

I had a couple girlfriends around for a party just before Christmas and I wanted to treat them to dessert instead of the usual savoury snacks. If I made a large, whole cheesecake, they’d probably only feel like eating that and nothing else. I got the idea from a recent blogging event that if I made mini cups of cheesecake, everyone would get a couple bites and enjoy the cheesecake dessert without filling up too much and get to try a few other things I had on offer.

These are ridiculously easy to make using the spreadable tub of cream cheese. No need to worry about setting it with gelatin or adding butter to the biscuit base to firm it up. Great for a large buffet too. My recipe made 10 but you could double or even triple the recipe if you were feeding a crowd.

I had a couple rows of chopped hazelnut milk chocolate, melted that and added about the same quantity of Nutella. Then just mix in a 250gm tub of cream cheese.

I then crushed a basic chocolate biscuit and put a spoonful into the bottom of these clear, plastic cups I bought from the dollar store.  I

think it was about $2 for a pack of 10. You could use any small cup or glass, like a shot glass. They looked cute on the serving tray. You could make them in a larger glass or cup.

You could just spoon the cheesecake mixture straight onto the biscuit crumbs but I piped it on. I sprinkled the remaining chopped hazelnut milk chocolate on top for garnish and refrigerated. The cheesecake mixture set just enough to firm up. It looks a little soft in the photo because it was a hot day. Stay tuned for the other flavour mini cheesecake cups I made for the party.

Mini Choc Hazelnut Cheesecake Cups

  • 250gm tub of cream cheese
  • 2 rows of hazelnut chocolate, roughly chopped (or any plain chocolate with a few chopped hazelnuts)
  • extra chopped hazelnut chocolate for garnish
  • 1/4 cup Nutella
  • 10 plain chocolate biscuits, made into crumbs
  1. Melt chocolate. (I use the microwave in small bursts to melt chocolate.)
  2. Add Nutella and mix well.
  3. Allow to cool and add cream cheese and mix well.
  4. Spoon a tablespoon of biscuit crumbs into the bottom of a small cup.
  5. Pipe or spoon cream cheese mixture onto biscuit crumbs.
  6. Garnish with extra chopped chocolate.
  7. Refrigerate before serving.

Makes 10 small cups.

Monday, October 14, 2013

Mini Banana Choc Chip Muffin Bites

Friends have been taunting me with delicious banana cake/bread recipes for the last couple of weeks. I have to admit banana cake isn’t one of the most popular things on my list of things to bake. I used to love it when it first became popular but I don’t think I like that overripe banana taste anymore so haven’t been making it much. The trouble is I nearly always have overripe bananas on hand or in the freezer ready to be whipped up into icy poles or the dreaded banana cake.

While at the supermarket today, I was browsing the pre-packaged ‘kid snacks’ that are oh so handy to throw into their lunch boxes when I spotted these. I don’t ever buy them except sometimes those long jelly ropes or the odd cheese spread with crackers. These were $5 for 6 and they were tiny, tiny, tiny. I was even more determined to use up those 2 rotting overripe bananas on top of my fridge. As it turns out, with my standard muffin recipe, I yielded 36 mini muffin ‘bites’. They were popped in the freezer and if I play my cards right, they should last my son until nearly the end of this term.
These little muffin trays are perfect for little mouths. Even if my son was to have 2, it would be okay. I did a rough costing on these including allowing for running the oven and the details are as follows:
2 cups self raising flour = 10 cents
1/2 cup chocolate chips = 80 cents
1 egg = 41 cents 
1/2 cup sugar = 16 cents
1 cup milk = 50 cents
1/4 cup oil = 18 cents
2 overripe bananas = 60 cents
1 tsp cinnamon = 10 cents
Running oven for 1 hour = 64 cents
Total = $3.49 (divided by 36) equals 9 cents per muffin

(By the way, that’s the recipe above. Just bake until golden on a 160 deg C oven.)

So you can see its way more cost effective to make this sort of thing at home and even I liked these. I think the teaspoon of cinnamon took away that overripe banana taste. Oh, and if you’re looking for really great banana cake recipes, these are four that I had on my to do list. If only I liked bananas a little bit more.
BANANA BREAD

Tuesday, July 23, 2013

Mini lemon & blueberry loaves with lemon drizzle

Did I ever tell you I love a mini loaf? Its not too small and its not too big, just right (as Goldilocks would say). They pack well in square containers, big enough for the big school appetite and big enough for a morning tea break without being too full for lunch. Oh what the heck! I love cake, at any size but I do love how these mini loaves turn out.
I was lucky enough to take part in trialling some of the new Coles Create & Bake range and I must admit, what could be so different about these packet mixes that I haven’t tried before? I’ve always bought the ‘no name’ brand for the kid’s birthday cakes and I might use one if I’ve got to ‘take a plate’, that age old Australian tradition of taking something with you when you’ve been invited for a bite to eat.
I really had visions of something with lemon and blueberries so I picked up the blueberry mix in the Create & Bake range and was pleasantly surprised at how full of actual blueberries it was. There was two packets of blueberries in the box and the other will keep for a long time in the pantry. I filled the mini loaf pan with the delightfully lemon scented batter (and I got to lick the bowl all by myself) and swirled through the chunky blueberry puree.

If you had ‘smellovision’, when these little loaves finished baking the house smelt like a cake shop. I was really surprised at how well the loaves had risen and how the cake had such a beautiful crumb, very much like a homemade cake and unlike normal packet cake mixes.

I had one packet of the lemon icing mix in the Coles Create & Bake range leftover from the Apple & Ginger Cakes with Lemon Icing I made the other day so used that to drizzle over the cake. I served it with some new, in season strawberries, with a cup of hot tea in Mum’s china and I felt like a Queen.

I think I’ll be keeping a couple of packets of this basic lemon cake mix on hand, if not for the convenience but for the taste and the versatility of this mix. Stay tuned for another recipe using the lemon cake mix later this week.

Disclaimer:  This is not a sponsored post. I received products from the Coles Create & Bake range to try. All thoughts, opinions, photos and recipes are my own.

Tuesday, June 4, 2013

Mediterranean Mini Quiches

I tell you, it doesn’t take me much to make me happy. One thing is to have a well stocked pantry and a few extra ‘luxury’ ingredients. I was scrounging for something a little bit nicer for lunch one day and I spotted the jar of olives and roasted capsicums I had in the fridge. I also had some feta cheese and ham and immediately thought of something mediterranean. I was reminded of Laney’s Pancetta crusted quiches she cooked for the Blogger cook off final a couple weeks ago and decided to line the quiches with ham I had in the fridge.

They were really easy to throw together and made all that much nicer with some of my favourite ingredients, olives and roasted capsicum. Using the ham as the ‘pastry’ case made it a little lighter than using pastry.

They don’t have to be Mediterranean. You could use leftover roast or grated vegetables, cheese, ham, tuna, corn, onion, herbs, mushrooms and the list goes on. Make smaller sized quiches for a bite sized canapĂ©.

Serve with a side salad for a light, filling lunch. I’ve got some in the freezer too for a quick lunch.

Mediterranean Mini Quiches

  • 6 slices ham, pancetta or bacon
  • 2 eggs
  • 2 tbs water
  • Kalamata olives, roasted capscium, feta cheese
  • 1 tbs dried parsley
  • 1 tsp dried oregano
  • 1 tsp dried basil
  • salt & pepper
  • oil spray
  1. Spray inside 6 Texas sized muffin tray.
  2. Line each with a slice of ham.
  3. Beat eggs, add water and add other ingredients.
  4. Pour into ham case.
  5. Bake on 170 deg C (350 deg F) until set on top (approx 15 mins).
  6. Serve with a salad or vegetables.

Serves 6.

Thursday, June 2, 2011

Pear & Coconut Mini Muffins

No time to waste around here, so while the oven was on baking cookies, I had to whip up something extra for the kid’s lunch boxes and afternoon tea. Mini muffins are ideal because they’re just a bite sized little morsel, don’t take long to eat, freeze well and taste scrummy. It’s also a good way for me to use up fruit that’s going a little bad. I found 2 sad looking pears in the fridge so Pear and Coconut it was going to be. I so wanted to sprinkled some flaked almonds on top but with nut allergies at both Kindy and School, I didn’t.

I used my Basic Muffin recipe, previously posted, and just added a few ingredients. I don’t worry about cupcake papers for these mini muffins as it’s one less thing the kids have to worry about at lunch time.

Pear & Coconut Mini Muffins

2 cups Self Raising flour
1/4 cup oil
1/2 cup sugar
1 cup milk
1 egg
2 pears, peeled and finely diced
1/2 cup coconut

Add all ingredients, mix lightly and pour into muffin pan and bake in a 180 deg C oven for 15 minutes. Makes a dozen large sized muffins, 18 cupcake sized muffins or 24 mini muffins.

Linking up with Rhonda from Down to Earth Friday feature, “On My Mind”.?

Thursday, May 5, 2011

Mini Caramel Mudcake Cupcakes with Caramel Icing

What a day! You’d think the lead up to Mother’s Day would be pretty low key. No, not in this house. It started off with helping out in my daughter’s classroom, calling into the shops and electronic banking was down with my bank so a trip to the bank and a queue 20 deep. Then it was home to make some cupcakes for my daughter’s Girl Guides “Mother’s Day” afternoon tea and to attack the stench that was in my daughter’s room (refer previous post). Then it was back up to my daughter’s school church for a Mother’s Day Liturgy, a snake slithering past me while I waited to pick her up, ice the cupcakes, Guide’s afternoon tea and then a Mother’s Day craft evening at the local hardware store (Bunnings for the Aussies) and then home. Kids were asleep in about 5 minutes and I won’t be far behind them.

I don’t know why I went down the ‘caramel’ road. Maybe it had something to do with a friend of mine mentioning a caramel icing recipe she found. I get these thoughts in my mind and I can think of nothing else. (Don’t mention peanut butter to me. Oh damn it! Now I’ll have to have some.)

I found this recipe here for Caramel Mudcake Cupcakes and it was so damn easy. Just melt the butter, sugar, white chocolate etc etc. Mix into the flour and that was it.

The caramel icing was just as easy and the recipe is here. They went like ‘hotcakes’ at the Guide meeting and everyone raved about them. I think this might be a new favourite recipe and it is inevitable that it will no doubt be turned into a chocolate version (or peanut butter).

Caramel Mudcake Cupcakes with Caramel Frosting

3.5 oz (100g) white chocolate buttons
4.5 oz (125g) butter, chopped
2/3 cup brown sugar
1/4 cup golden syrup
2/3 cup milk
1 cup plain flour
1/3 cup self raising flour
1 egg, lightly beaten

Preheat the oven to 170 deg C. Combine the chocolate, butter, sugar, syrup and milk in a saucepan. Stir over a low heat until melted and combined. Allow to cool for about 15 mins. Sift the flours. Mix flours into the caramel mixture. Stir in the egg. Bake for 30 mins.

Caramel Icing:
125g butter, chopped
1 cup (200g) firmly packed brown sugar
1/3 cup (80ml) milk
1½ cups (240g) icing sugar mixture

Melt butter in small saucepan. Stir in brown sugar and milk; bring to a boil. Reduce heat; simmer, uncovered, 3 minutes, cool. Gradually stir in icing sugar until frosting is of spreadable consistency.

Note: I nearly always make mini sized cupcakes for kids as they usually only eat the icing and leave the cake.