Showing posts with label Snack. Show all posts

Wednesday, September 13, 2017

Homemade Apricot Coconut Bites

I’m always trying to change up the lunch box snacks in the kid’s school lunches (well, for my son really because my fussy daughter’s selection hardly ever changes) so when I’m at the supermarket, I look at what snacks are available and think about making them from scratch at home. I can remember my Mum making something similar and thought I’d try a batch of Homemade Apricot Coconut Bites.

Homemade Apricot & Coconut Bites www.domesblissity.com

The best part about having a well stocked pantry is that you can make this sort of thing all the time if you run out of snacks for the kids. It doesn’t haven’t to be apricots. If you have any dried fruit like sultanas, apples, pears, dates or any other sticky dried fruit. I always have coconut and oats so these were going to be really easy to make.

Homemade Apricot & Coconut Bites - www.domesblissity.com

These are the type of snack I see in the supermarket. These are around $2.75 and there are 5 serves in the packet. As you see in my photo up top, I got about 16 slices from the batch I made and 2 small pieces in my son’s lunch box was enough to keep him going. It also kept well in the fridge but you could freeze if you wanted to keep it longer. I found it nice on a fruit and cheese platter for a quick lunch for myself. Just something a little bit different from the usual sandwich.

Homemade Apricot & Coconut Bites www.domesblissity.com

You could chop the apricot finely if you didn’t have a food processor but I whizzed up all the ingredients in my trusty food processor.

Homemade Apricot & Coconut Bites www.domesblissity.com

Next, spread out mixture onto a sheet of laid out plastic wrap.

Homemade Apricot & Coconut Bites www.domesblissity.com

Form a log shape.

Homemade Apricot & Coconut Bites www.domesblissity.com

Roll up into a ‘sausage’ shape and refrigerate for about 30 minutes.

Homemade Apricot & Coconut Bites www.domesblissity.com

Unroll from the plastic wrap and sprinkle with more coconut and roll, ensuring that the entire ‘log’ is covered in coconut.

Homemade Apricot & Coconut Bites www.domesblissity.com

Slice into about 1cm (.5″) slices and store in a suitable container in the fridge or freezer until required.

This was so easy. I didn’t have to add any extra sugar like I’m sure the store bought version had and they tasted exactly the same. My son loved them and they’ll be a regular in lunch boxes to come for sure. They’d also work well rolled into a ball then rolled in the coconut if you wanted to make those energy type bliss ball snacks. This would also be a great seller at fetes and fairs.

Homemade Apricot & Coconut Bites

A delicious snack for school lunch boxes or a fruit and cheese platter. Great to sell at fetes and fairs for a healthy alternative to sweets.
Prep Time 15 minutes
Total Time 15 minutes
Servings 8
Author Anne Murphy

Ingredients

  • 1 cup dried apricots
  • 1 cup coconut
  • 1 cup rolled oats
  • 2 tablespoons of honey add extra if too dry or add more oats if too wet
  • extra coconut for rolling

Instructions

  1. Using a food processor, combine all ingredients and pulse until apricot has been finely chopped and all ingredients incorporated.
  2. If you don't have a food processor, finely chop apricots and combine all ingredients.
  3. Turn out mixture on a sheet of plastic wrap.
  4. Press into a log shape and roll up the sheet of plastic wrap until a log shape forms.
  5. Refrigerate for approximately 30 minutes.
  6. Unwrap from plastic wrap and roll the log shape into extra coconut.
  7. Cut into 1cm (.5") slices.
  8. Refrigerate until required.
  9. Suitable to freeze.

Recipe Notes

Substitute apricots with other similar sticky dried fruit like dried pears, peaches, sultanas or dates.
Can be rolled into a ball shape and rolled in coconut.

Homemade Apricot Coconut Bites www.domesblissity.com

Wednesday, July 20, 2016

Make your own Bhuja Snack Mix

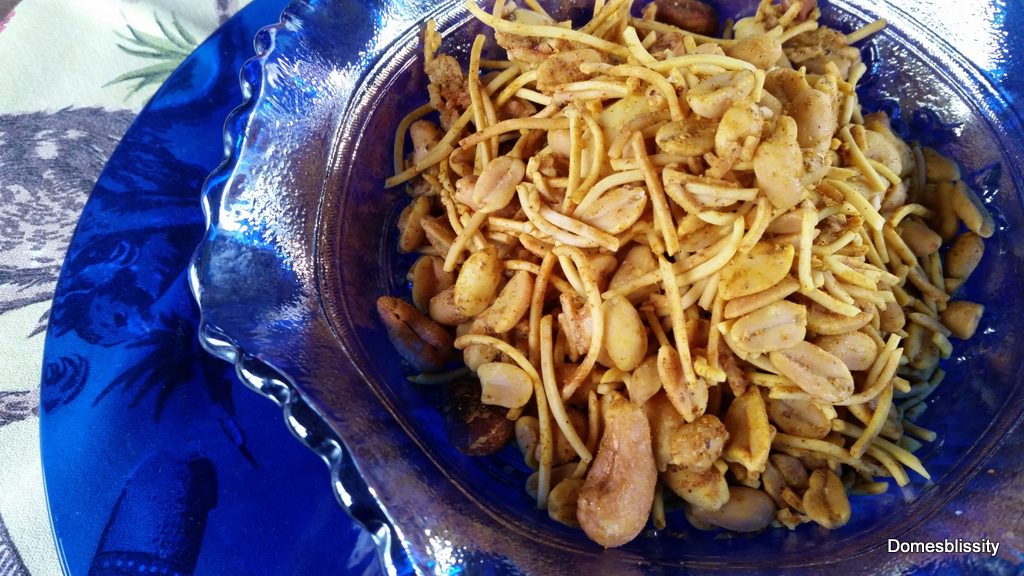
We all have our guilty pleasures I guess. Chocolate, potato chips, candy, nuts and whatever else we like to snack on. Me? I pretty much love all of those but I have a real weakness for the store bought Bhuja Snack Mix.  I want to teach you how easy it is to make your own Bhuja Snack Mix.

Make your own Bhuja Mix www.domesblissity.com


The store bought Bhuja mix has so many varieties so when you make it yourself you can add whatever you like and make it as spicy as you like. Bhuja mix is more commonly known in India as chevda or chanachur, or in the United Kingdom as Bombay Mix or in the USA as Chex Mix. It’s basically a mix of nuts, dried noodles, dried fruit, dried green peas and different forms of rice crackers.


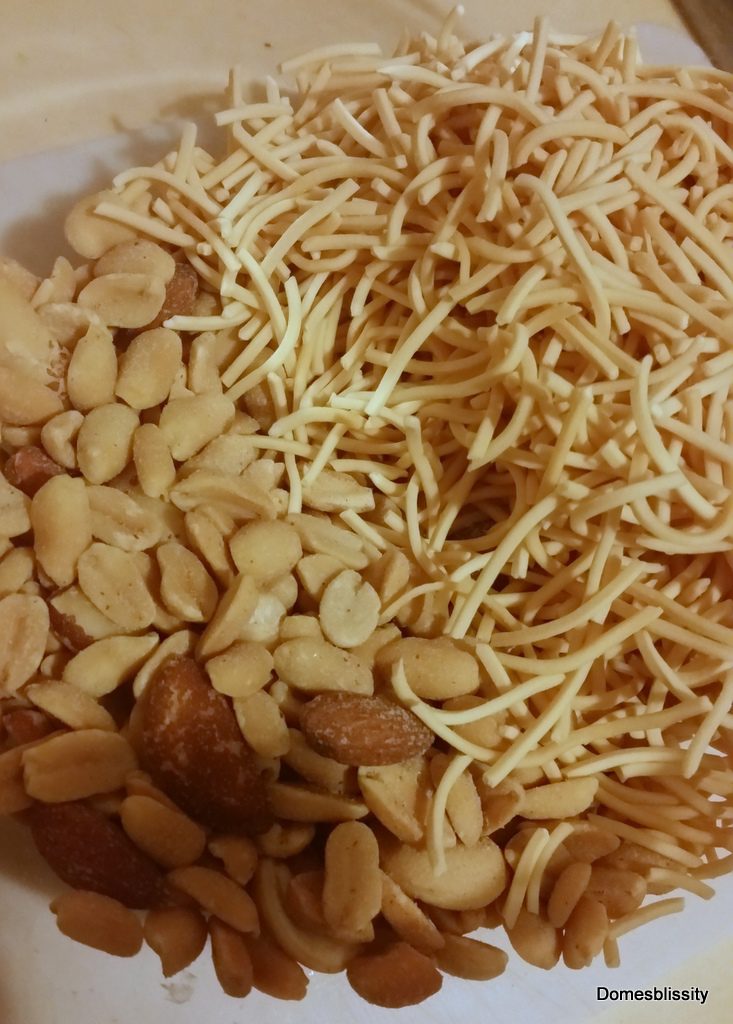
I just happened to have a small bag of mixed nuts and they would’ve been nice enough on their own but when I saw I still had a small packet of dried noodles in the pantry, I immediately started thinking about my beloved bhuja mix. I don’t like dried fruit added and can take or leave the green peas so this is all I had in mine.


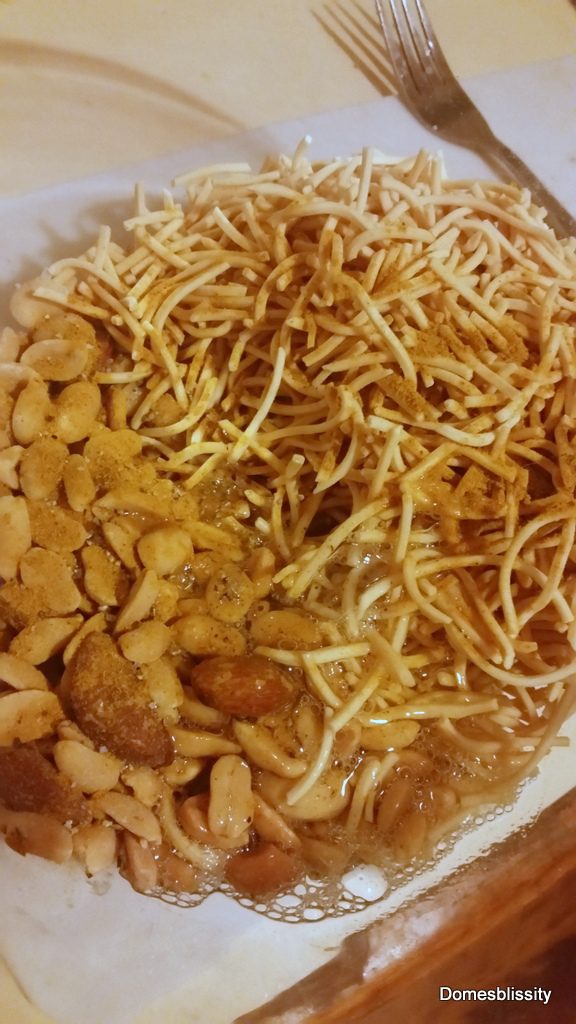
Then, all you need to do is add your blend of spices, a beaten egg white and toss it all together. I used curry powder, paprika, a little bit of chilli powder (I made sure knew I was the only one eating this lot) and salt and pepper.

Make your own Bhuja Snack Mix www.domesblissity.com


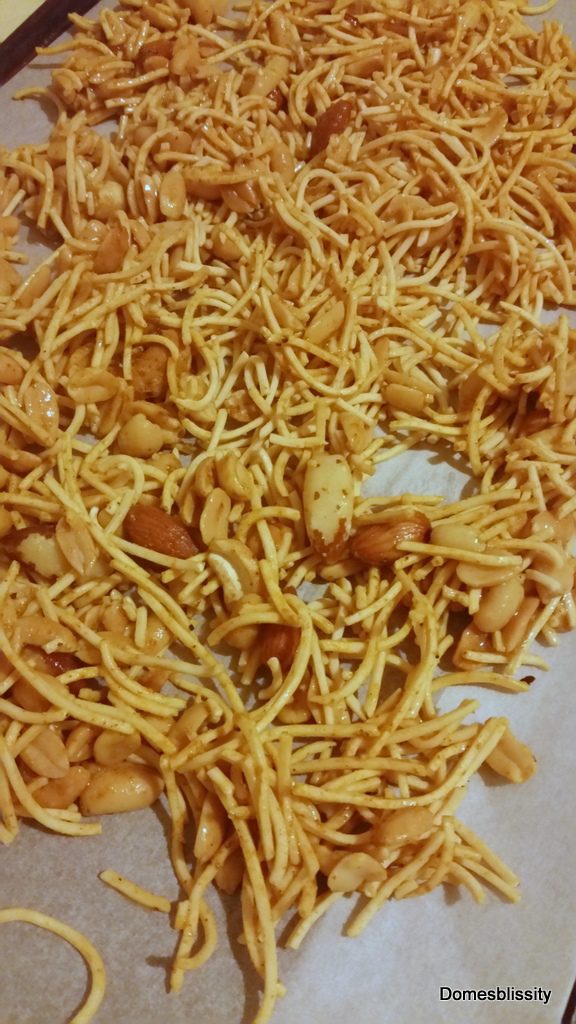
Spread on a baking tray lined with baking paper and bake in a 180 deg C oven for about 10 to 15 minutes or until aromatic.

Make your own Bhuja Snack Mix www.domesblissity.com

Bhuja Mix is the perfect accompaniment for drinks, a cocktail party, lunch box treats (if nuts are allowed at school) after school snacks and munching out on in front of the TV, as I did. They are also gluten free. The best part of all to making it yourself is the price. To buy them ready made is about $3.00 for approximately 150 grams. Homebrand salted peanuts are around $2 for for 350gm and fried noodles are about $1.25 for 100 grams. Add a couple of spices from the pantry and an egg white. For around $4 you’ll have triple the quantity. Hope you give it a try.

Suggestions for your own Bhuja Mix:

  • peanuts
  • cashews
  • almonds
  • fried noodles
  • 2 minute noodles
  • dried green peas
  • sultanas
  • other dried fruit
  • chickpeas
  • pumpkin seeds
  • sunflower seeds
  • rice cracker snacks
  • Spices: curry powder, paprika, chilli powder, garlic powder, turmeric, cumin, coriander, ginger, cinnamon

Make your own bhuja snack mix www.domesblissity.com


Tuesday, October 20, 2015

Easy Caramel Filled Muffins


I find that muffins are the best thing to add to my children's lunch boxes. The recipe I use only has half a cup of sugar and a quarter cup of oil. I find a muffin is a lot firmer than a cake so it holds well up to the rough and tumble action my children's lunchboxes take, in particular with my son. I'm always trying new muffin recipes to change it up from the usual chocolate chip or apple cinnamon.


My sweet tooth has been copping it a bit lately, especially with help from my sweet loving husband. (Yes, he is sweet and loving but he has a love of sweets and lollies but doesn't put on any weight. Yes, I know, one of those people.) We've been going back to the retro sweets of our childhood and I saw these Jersey Caramels in the shop. I decided to use them in the baking of the muffin and it worked perfectly.


This is just my basic muffin recipe except I used brown sugar instead of white. It comes together so easily and quickly. If I've missed baking on the weekend, I usually whip these up while I'm cooking dinner on a Monday night. 


Once you've scooped the muffin batter into the cupcake papers, press a Jersey caramel into the centre of the batter and bake.


The result was delicious. While warm, the caramel was ooey and gooey. After we all had a 'taste', I popped them straight into the freezer so the caramel firmed up again. I'm not sure if I preferred them with the runny caramel or the firmer kind. Both were delicious. I wouldn't suggest going out to buy a packet of caramels just for this recipe but rather change up your recipes with the odd packet of sweets you have lying around (if that's the case at your place). It's not often the case at our place as they don't last too long. 

Easy Caramel Filled Muffins
  • 2 cups Self Raising flour
  • 1/4 cup oil (I used Canola)
  • 1/2 cup brown sugar
  • store bought Jersey Caramels, or similar
  • 1 cup milk
  • 1 egg

  1. Add all ingredients, mix lightly and pour into cupcake papers and bake in a 180 deg C oven for 15 minutes. 
  2. Makes a dozen large sized muffins, 18 cupcake sized muffins or 24 mini muffins.


Monday, October 19, 2015

Easy Caramel Filled Muffins

I find that muffins are the best thing to add to my children’s lunch boxes. The recipe I use only has half a cup of sugar and a quarter cup of oil. I find a muffin is a lot firmer than a cake so it holds well up to the rough and tumble action my children’s lunchboxes take, in particular with my son. I’m always trying new muffin recipes to change it up from the usual chocolate chip or apple cinnamon.
My sweet tooth has been copping it a bit lately, especially with help from my sweet loving husband. (Yes, he is sweet and loving but he has a love of sweets and lollies but doesn’t put on any weight. Yes, I know, one of those people.) We’ve been going back to the retro sweets of our childhood and I saw these Jersey Caramels in the shop. I decided to use them in the baking of the muffin and it worked perfectly.
This is just my basic muffin recipe except I used brown sugar instead of white. It comes together so easily and quickly. If I’ve missed baking on the weekend, I usually whip these up while I’m cooking dinner on a Monday night.

Once you’ve scooped the muffin batter into the cupcake papers, press a Jersey caramel into the centre of the batter and bake.

The result was delicious. While warm, the caramel was ooey and gooey. After we all had a ‘taste’, I popped them straight into the freezer so the caramel firmed up again. I’m not sure if I preferred them with the runny caramel or the firmer kind. Both were delicious. I wouldn’t suggest going out to buy a packet of caramels just for this recipe but rather change up your recipes with the odd packet of sweets you have lying around (if that’s the case at your place). It’s not often the case at our place as they don’t last too long.

Easy Caramel Filled Muffins

  • 2 cups Self Raising flour
  • 1/4 cup oil (I used Canola)
  • 1/2 cup brown sugar
  • store bought Jersey Caramels, or similar
  • 1 cup milk
  • 1 egg
  1. Add all ingredients, mix lightly and pour into cupcake papers and bake in a 180 deg C oven for 15 minutes.
  2. Makes a dozen large sized muffins, 18 cupcake sized muffins or 24 mini muffins.

Tuesday, September 1, 2015

Make your own curly fries at home


We very rarely take the children out for dinner, rather opting for the occasional pizza. It's not that we don't want to but I hate paying exorbitant prices for food that I can cook just as well at home. They do frequent a particular restaurant with the Dad that makes 'curly fries' and they rave about them, especially my fried potato loving daughter who won't eat anything else.


I'm also not in the habit of buying new gadgets or appliances but I did happen to see a 'slinky machine' on a recent shopping trip which had been marked down. My kids love eating the apple once it's been 'slinked', skin and all. I had some long, skinny potatoes so thought I'd try my hand at 'slinking' the potato and they didn't turn out too bad.


I chose to keep the skin on but the gadget does have an in-built peeler. Oh, it was also a good opportunity to get the kids to help prep dinner. They love operating the slinky machine.


Once the machine has done it's job, you're left with what is the 'core' of the potato and they got 'fried' as well. I don't own a deep fryer nor do I like deep frying food so I oven baked these fries and they turned out lovely and crisp.


Sometimes little bits broke off but most of the time I was left with the entire 'curl' from the potato.


Toss them in a bowl with plenty of salt and pepper and a drizzle of olive oil.


Then put on an oven tray in a moderately hot oven until crispy and golden brown.


Everyone loved them. I loved the 'cores' the best as they were light and fluffy inside. Not sure I'd go to the trouble again but for a special occasion, they were a bit of fun and not a single one was left. I'm not sure what you could substitute if you don't have a slinky machine but I know there are heaps of gadgets on the market out there for 'curling' vegetables. I might try carrot next time.

What vegetables would you try?

Monday, August 31, 2015

Make your own curly fries at home

We very rarely take the children out for dinner, rather opting for the occasional pizza. It’s not that we don’t want to but I hate paying exorbitant prices for food that I can cook just as well at home. They do frequent a particular restaurant with the Dad that makes ‘curly fries’ and they rave about them, especially my fried potato loving daughter who won’t eat anything else.

I’m also not in the habit of buying new gadgets or appliances but I did happen to see a ‘slinky machine’ on a recent shopping trip which had been marked down. My kids love eating the apple once it’s been ‘slinked’, skin and all. I had some long, skinny potatoes so thought I’d try my hand at ‘slinking’ the potato and they didn’t turn out too bad.

I chose to keep the skin on but the gadget does have an in-built peeler. Oh, it was also a good opportunity to get the kids to help prep dinner. They love operating the slinky machine.

Once the machine has done it’s job, https://www.performancesaab.com/profile/4832214 you’re left with what is the ‘core’ of the potato and they got ‘fried’ as well. I don’t own a deep fryer nor do I like deep frying food so I oven baked these fries and they turned out lovely and crisp.

Sometimes little bits broke off but most of the time I was left with the entire ‘curl’ from the potato.

Toss them in a bowl with plenty of salt and pepper and a drizzle of olive oil.

Then put on an oven tray in a moderately hot oven until crispy and golden brown.

Everyone loved them. I loved the ‘cores’ the best as they were light and fluffy inside. Not sure I’d go to the trouble again but for a special occasion, they were a bit of fun and not a single one was left. I’m not sure what you could substitute if you don’t have a slinky machine but I know there are heaps of gadgets on the market out there for ‘curling’ vegetables. I might try carrot next time.

What vegetables would you try?

Wednesday, July 1, 2015

Ricotta, zucchini & cherry tomato tarts


Sometimes I go back through old recipes I've posted here, to find how I made something in particular to make it again and as I scroll through the recipe list, it looks like I must have this huge array of ingredients at all times, a fully stocked pantry, a refrigerator that resembles a deli and a freezer with whatever your heart desires. Well let me assure you, it's nothing like that. I would say 99.9% of the time, my recipes are created based on what I have left in the fridge, pantry or freezer and it needs using up, like yesterday!


It was one of those lazy Sundays when I needed to do some school baking for the week and we had kinda missed lunch, so while the oven was I thought I'd check what I had on hand to whip up a quick snack. I had one sheet of puff pastry, one tired looking zucchini, the last of the punnet of cherry tomatoes and about half a tub of ricotta cheese that was destined to be something else but I never got around to it. That's how these Ricotta, Zucchini & Cherry Tomato Tarts came about. I never get an urge to make something and rush to the store to buy a particular ingredient just so I can make it. Never. I always just make do and use what I have.


I've got these semi circle pans which are just perfect for tart making. I managed to squeeze out 12 circles of pastry, even joining some of the edges together to form rounds.


The filling is made up of the grated zucchini, the ricotta, grated tasty cheese, an egg, salt and pepper and a bit of garlic. The cherry tomatoes are popped on top.


Bake in the oven until filling has set (or until golden brown). We were starving by then so I took them out a little earlier than I should have. A delicious brunch, lunch, snack or party appetiser. Sprinkle with a little chopped chives for serving if you like. Remember, to only always use what you have. There is a substitute for just about everything.

Ricotta, Zucchini & Cherry Tomato Tarts
  • 1 sheet puff pastry
  • 200gm ricotta cheese
  • 1/2 cup grated cheese
  • 1 egg, beaten
  • 1 garlic clove, crushed
  • 1 zucchini, grated
  • cherry tomatoes
  • salt and pepper

  1. Preheat oven to 170 deg C.
  2. Cut circles from puff pastry and line either a cupcake pan or similar which has been sprayed with a little oil spray.
  3. Combine, ricotta, grated cheese, beaten egg, garlic, grated zucchini and salt and pepper.
  4. Spoon ricotta mixture into pastry cups.
  5. Top with halved cherry tomatoes.
  6. Bake in oven for approximately 20 minutes or until mixture has set and is golden brown.
  7. Suitable to eat hot or cold and suitable to freeze.
  8. Makes 12.


Tuesday, June 30, 2015

Ricotta, zucchini & cherry tomato tarts

 ricotta zucchini & cherry tomato tarts
Sometimes I go back through old recipes I’ve posted here, to find how I made something in particular to make it again and as I scroll through the recipe list, it looks like I must have this huge array of ingredients at all times, a fully stocked pantry, a refrigerator that resembles a deli and a freezer with whatever your heart desires. Well let me assure you, it’s nothing like that. I would say 99.9% of the time, my recipes are created based on what I have left in the fridge, pantry or freezer and it needs using up, like yesterday!
It was one of those lazy Sundays when I needed to do some school baking for the week and we had kinda missed lunch, so while the oven was I thought I’d check what I had on hand to whip up a quick snack. I had one sheet of puff pastry, one tired looking zucchini, the last of the punnet of cherry tomatoes and about half a tub of ricotta cheese that was destined to be something else but I never got around to it. That’s how these Ricotta, Zucchini & Cherry Tomato Tarts came about. I never get an urge to make something and rush to the store to buy a particular ingredient just so I can make it. Never. I always just make do and use what I have.
I’ve got these semi circle pans which are just perfect for tart making. I managed to squeeze out 12 circles of pastry, even joining some of the edges together to form rounds.
The filling is made up of the grated zucchini, the ricotta, grated tasty cheese, an egg, salt and pepper and a bit of garlic. The cherry tomatoes are popped on top.
Bake in the oven until filling has set (or until golden brown). We were starving by then so I took them out a little earlier than I should have. A delicious brunch, lunch, snack or party appetiser. Sprinkle with a little chopped chives for serving if you like. Remember, to only always use what you have. There is a substitute for just about everything.
Ricotta, Zucchini & Cherry Tomato Tarts
  • 1 sheet puff pastry
  • 200gm ricotta cheese
  • 1/2 cup grated cheese
  • 1 egg, beaten
  • 1 garlic clove, crushed
  • 1 zucchini, grated
  • cherry tomatoes
  • salt and pepper


  1. Preheat oven to 170 deg C.
  2. Cut circles from puff pastry and line either a cupcake pan or similar which has been sprayed with a little oil spray.
  3. Combine, ricotta, grated cheese, beaten egg, garlic, grated zucchini and salt and pepper.
  4. Spoon ricotta mixture into pastry cups.
  5. Top with halved cherry tomatoes.
  6. Bake in oven for approximately 20 minutes or until mixture has set and is golden brown.
  7. Suitable to eat hot or cold and suitable to freeze.
  8. Makes 12.