Showing posts with label Cleaning. Show all posts

Wednesday, October 17, 2018

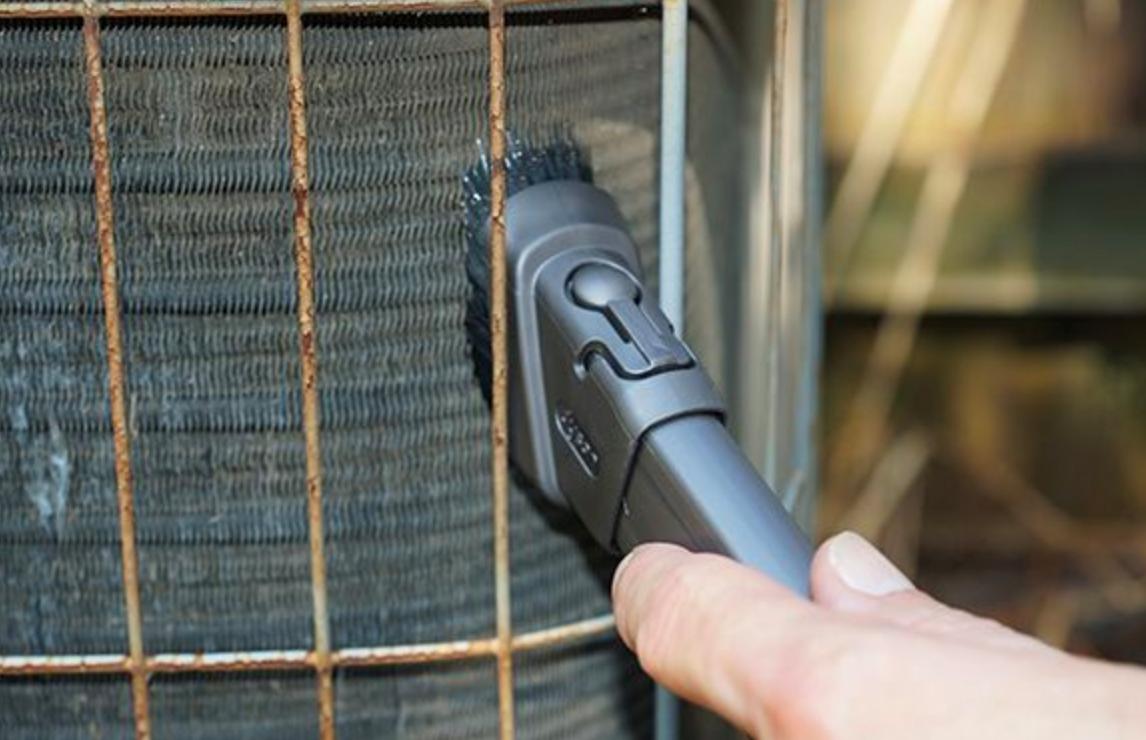
How to Keep Breathing Fresh Air Through Your AC Unit

Homeowners have quickly come to realize that the maintenance of systems and appliances is just as important as the acquisition of them. This is particularly true of air conditioning units which serve a vital function in homes. AC units are tasked with maintaining the right temperature in a home. While this varies from one household to the next, 75°F (23.9C) and thereabouts is considered an acceptable indoor temperature during the summer months. Any lower, and homeowners will quickly find themselves paying excessive electric bills and more often than not, face an AC unit on the fritz. Here’s how to keep breathing fresh air through your AC unit.
How to Keep Breathing Fresh Air Through Your AC Unit www.domesblissity.com

Unfortunately, poor maintenance results in costly repairs and replacements. The average price of an air conditioning unit for a home ranges between $3,740 and $7,209 with central air conditioning systems. Of course, homeowners also have the option of a window air conditioning system which retails at approximately $300 per unit. Regardless, there are many ways to ensure that AC units are properly maintained. These simple fixes can save thousands of dollars in the long run, and prevent homeowners from the uncomfortable inconvenience of an AC unit that unexpectedly stops functioning.

Easy Fixes for AC Units

AC units, like other appliances need to be maintained to function optimally. This begins with proper cleaning of AC units. Unbeknown to many, there are easy ways to clean these air conditioning systems without breaking the bank. It is estimated that savings of between $250 – $500 are possible by cleaning the AC unit oneself. Of course, there are important tips, tricks, and techniques to follow to avoid causing any damage to the system.

The following steps must be followed if you want to learn how to clean an air conditioning unit:

  • Disconnect the AC unit from the power supply or simply turn it off at the mains.
  • Locate the AC unit outside the home, and ensure that it is free from plant overgrowth, sand, and other debris.
  • Remove the top grill from the AC unit (this prevents animals and objects from falling inside the unit).
  • Water pressure through a water hose must be used from the inside of the AC unit to the outside.
  • A light water stream must be used, not a heavy water stream since this can damage the coils.
  • There are also screws holding the cover onto the AC unit. These can be removed for deeper cleaning.
  • The reason the water hose must be used from the inside and not the outside, is to push the dirt away from the coil and the ridges.

Clean AC Units Equals Greater Efficiency & Lower Costs

The reason why it is essential to clean an AC unit is for greater efficiency. When an air-conditioning unit has been cleaned, it functions much better. It can be thought of in the same way as an artery blocked with too much fat and cholesterol versus one which allows the blood to flow freely through it. More pressure is added to the system when there are blockages (a.k.a. dirt and debris) versus one which can allow the free flow of air through the system. A simple cleaning like that can save hundreds of dollars in service technician fees for A/C unit breakdowns.

It’s not only homeowners who should be concerned about keeping AC units in proper functioning order. It’s renters too. Rather than waiting for the landlord or the maintenance department of a complex to respond to a call, it makes sense to simply keep the unit clean as best as possible by changing AC filters on a monthly basis, and ensuring that the unit is clean and in good working order. There are also various home protections in the form of home warranties which cover AC units, provided the owner maintains the unit appropriately. Many home warranty companies will deny a claim if it is found that the homeowner was negligent in properly maintaining the AC unit.

Keep a Calendar For A/C Unit Cleaning

The home care and cleaning of A/C units is relatively simple. All that’s needed is a pair of work gloves, garden shears or a weed whacker, a garden hose, and a power drill/set of screwdrivers. These tools and implements must be used as described above to clean the air conditioning filters. Chemicals can be used, provided there is sufficient ventilation and proper care and use instructions are followed. Whether you’re cleaning an outside AC unit or a window air conditioning unit, it’s important to ensure that safety comes first.

Window A/C units should be unplugged and removed from the windows and then cleaned. Products like air conditioner evaporator cleaner are available online, or at a local retail store, and should be sprayed on the dirty components of the coils. It may be necessary to rinse the cleaner away, and protective gloves and breathing apparatus should always be used. Keep track of your AC unit cleaning regimen, to ensure that you don’t miss the next cleaning in the future.

Wednesday, December 9, 2015

How to vacuum your entire house in 17 minutes or less

dyson-v6-absolute

Well, Christmas has come early to the Domesblissity household. I was so very fortunate to have received the latest in vacuuming technology from Dyson, the market leaders in the most powerful, cordless, stick vacuums. 

dyson-good-food-brisbane

Having seen the Dyson V6 Absolute Handstick Cordless Vacuum in action at the recent Good Food & Wine Show in Brisbane, I got to see first hand, the powerful V6 digital motor in action for myself. This version of the Dyson cordless vacuum, comes with 2 cleaning heads, which work on hard floors or carpet.

From large debris to fine dust (or flour in my case), the patented cyclone technology and an entirely re-invented cleaner head captures it all. 

A highly efficient post-motor filter expels air cleaner than the air you breathe. 

dyson-floor-types

But the best part about it for me is that the Dyson V6 has a trigger grip that releases instantly so you’re not wasting charge as you’re moving from room to room or changing the cleaning head or the cleaning attachments. I’ve got a 3 level house and there’s polished timber floors, tiles and carpet and the Dyson makes light work of all surfaces without having to change cleaning heads. If I pick up all the mats (and Lego) off the floor, I can vacuum my entire home in 17 minutes or less. That’s the amount of time a fully charged V6 will retain power.

dyson-v6-ease-of-use

There is a ‘max mode’ which lasts for 6 minutes for those really difficult tasks when you need increased suction power. I haven’t had to use that yet but knowing my family, they will surely spill something on the floor that will require some boosted power. 

I’d like to thank Santa Dyson for this wonderful gift and for making my life easier. Just think what else you could do with all that extra time without having to lug around your old vacuum, plugging and unplugging as you move from room to room? Hmmm, let me think?

relaxation, relaxing, home

  • Have a cup of tea and read a magazine.
  • Go for a walk.
  • Give yourself a DIY pedicure.
  • Paint your nails.
  • Read a book.

bakery, cooking, baking

  • Bake.
  • Clean something else (well, maybe).
  • Prepare dinner.
  • Go shopping.
  • Meet up with a friend for coffee.
  • Watch TV.

Bath Water, Badeschaum, Soap Bubbles, Bath, Bath Foam

  • Have a soak in the bath.
  • Watch a DVD.
  • Go to the cinema.
  • Craft, sew, quilt, crochet or knit.
  • Anything else but clean.

Thank you Mr Dyson, yet again, for inventing such a wonderful tool to make our lives so much easier.


Disclaimer: In return for visiting the Dyson exhibit at the recent Good Food & Wine Show in Brisbane and reviewing the Dyson V6 Absolute Handstick Vacuum Cleaner, I received a vacuum to keep. All thoughts and opinions are my own.

Wednesday, October 28, 2015

How to wash thermal lined curtains


I have to be honest and up front and say that there really is no right or wrong way to wash thermal lined curtains. You can check the manufacturer's washing instructions or you can do it like I do, the safe way. I've washed many thermal lined curtains over the years. Some on a full wash cycle and they've come out perfect. Other times they've come out with the thermal lining stuck together and unable to be saved. The lining just peels off as you try to untangle the huge mess you've been left with. Anyone else know what I'm talking about?


My spring cleaning schedule has taken a bit of a back seat this year. The 1st of September signals the start of Spring here in Australia and getting married on the 12th and just returning from my honeymoon, I have kind of let it go. Priorities, right? I did, however, make a start on the living room. As you can see, the curtains are very grimy on the bottom due to the condensation build up from the windows in the winter. I do try to vacuum the curtains on a regular basis but it doesn't clean the thermal lined backing.


As soon as the curtains came down, I gave the windows a quick wipe with a microfibre cloth and just water. It's the easiest and most cost effective method of cleaning windows I've found that doesn't leave any streaks whatsoever.


It's also a good opportunity to give all the curtain fittings a good clean too.


The best way I've found to clean thermal lined curtains is to fill your washing machine with warm water and a little soap powder and dissolve the powder (or liquid if you use it) well. Once your washing machine has filled, put in the curtain and let it go through the wash cycle. Don't let the machine start to spin.


Once complete, fill your laundry tub with water and rinse well.


Then just hang it straight on the clothesline, ensuring you peg on the top where the seam is. That will ensure no creases are left halfway down the curtain when you hang it back up. I don't bother ironing or pressing the curtains. On a nice sunny, breezy day, all the wrinkles will go.


And that's it! If the water wasn't too dirty when you washed the first curtain, repeat with remaining curtains otherwise drain the washing machine and refill. I try to do one room at a time. One room's curtains down, two to go. I'm on a mission to get it all done by the end of October and looking at my schedule I've got no hope in hell of accomplishing that. Wish me luck!


Tuesday, October 27, 2015

How to wash thermal lined curtains


I have to be honest and up front and say that there really is no right or wrong way to wash thermal lined curtains. You can check the manufacturer’s washing instructions or you can do it like I do, the safe way. I’ve washed many thermal lined curtains over the years. Some on a full wash cycle and they’ve come out perfect. Other times they’ve come out with the thermal lining stuck together and unable to be saved. The lining just peels off as you try to untangle the huge mess you’ve been left with. Anyone else know what I’m talking about?

My spring cleaning schedule has taken a bit of a back seat this year. The 1st of September signals the start of Spring here in Australia and getting married on the 12th and just returning from my honeymoon, I have kind of let it go. Priorities, right? I did, however, make a start on the living room. As you can see, the curtains are very grimy on the bottom due to the condensation build up from the windows in the winter. I do try to vacuum the curtains on a regular basis but it doesn’t clean the thermal lined backing.

As soon as the curtains came down, I gave the windows a quick wipe with a microfibre cloth and just water. It’s the easiest and most cost effective method of cleaning windows I’ve found that doesn’t leave any streaks whatsoever.

It’s also a good opportunity to give all the curtain fittings a good clean too.

The best way I’ve found to clean thermal lined curtains is to fill your washing machine with warm water and a little soap powder and dissolve the powder (or liquid if you use it) well. Once your washing machine has filled, put in the curtain and let it go through the wash cycle. Don’t let the machine start to spin.

Once complete, fill your laundry tub with water and rinse well.

Then just hang it straight on the clothesline, ensuring you peg on the top where the seam is. That will ensure no creases are left halfway down the curtain when you hang it back up. I don’t bother ironing or pressing the curtains. On a nice sunny, breezy day, all the wrinkles will go.

And that’s it! If the water wasn’t too dirty when you washed the first curtain, repeat with remaining curtains otherwise drain the washing machine and refill. I try to do one room at a time. One room’s curtains down, two to go. I’m on a mission to get it all done by the end of October and looking at my schedule I’ve got no hope in hell of accomplishing that. Wish me luck!


Wednesday, September 30, 2015

The easiest way to clean silverware


I was lucky enough to inherit my grandmother's silverware (including her bone handled knives) which I absolutely adore. I did have them all on display in a glass topped coffee table but the way my kids run through the house, it was an accident waiting to happen so the coffee table was put in the shed along with the cutlery.


Because I was having a vintage styled wedding, I thought it was the perfect opportunity to dig out the cutlery and give it a good clean. I also recently inherited my (now) mother-in-law's silverware which was also badly tarnished, as silverware tends to get but with over 100 pieces of cutlery, I didn't fancy sitting for hours on end polishing it.


I remember my Mum cleaning silverware this way but couldn't quite remember the quantities so I found the 'recipe' on the Apartment Therapy website on how to clean silver with baking soda and aluminium foil.


You could buy those disposable aluminium foil trays but I just dug out a baking dish and lined with aluminium foil. Add 1 cup of boiling water (boiled from the kettle), 1/2 cup white vinegar, 1 tablespoon of baking soda (or bicarb soda as it's also known) and 1 tablespoon of sea salt to the dish and stir. Add the cutlery and make sure it is fully immersed in the solution.


You'll see the tarnish disappear before your eyes. It's that simple. Some pieces might need a bit longer soaking or you might need to top up with hot water, vinegar or baking soda to bring back the 'fizz'. I'm no chemist so can't explain how it works but I just know that it does.


After I submersed all the silverware in this solution, I gave it a good wash in soapy warm water and dried thoroughly.


For my wedding favours (which also acted as place cards), I stuck a small foil wrapped chocolate to a tag and tied that to a knife and fork. It all came up lovely and shiny, ready for the wedding. I also gave a few other pieces a good soaking like cake slices and a silverware egg cup that belonged to my husband's late father. This is a really good tip to know should you have any silverware needing cleaning and you can do it without any harmful cleaning fluids and everyone should have baking soda and vinegar in their home. Hope you give it a try.

Tuesdays with a Twist Featured

Tuesday, September 29, 2015

The easiest way to clean silverware

I was lucky enough to inherit my grandmother’s silverware (including her bone handled knives) which I absolutely adore. I did have them all on display in a glass topped coffee table but the way my kids run through the house, it was an accident waiting to happen so the coffee table was put in the shed along with the cutlery.
Because I was having a vintage styled wedding, I thought it was the perfect opportunity to dig out the cutlery and give it a good clean. I also recently inherited my (now) mother-in-law’s silverware which was also badly tarnished, as silverware tends to get but with over 100 pieces of cutlery, I didn’t fancy sitting for hours on end polishing it.

I remember my Mum cleaning silverware this way but couldn’t quite remember the quantities so I found the ‘recipe’ on the Apartment Therapy website on how to clean silver with baking soda and aluminium foil.

You could buy those disposable aluminium foil trays but I just dug out a baking dish and lined with aluminium foil. Add 1 cup of boiling water (boiled from the kettle), 1/2 cup white vinegar, 1 tablespoon of baking soda (or bicarb soda as it’s also known) and 1 tablespoon of sea salt to the dish and stir. Add the cutlery and make sure it is fully immersed in the solution.

You’ll see the tarnish disappear before your eyes. It’s that simple. Some pieces might need a bit longer soaking or you might need to top up with hot water, vinegar or baking soda to bring back the ‘fizz’. I’m no chemist so can’t explain how it works but I just know that it does.

After I submersed all the silverware in this solution, I gave it a good wash in soapy warm water and dried thoroughly.

For my wedding favours (which also acted as place cards), I stuck a small foil wrapped chocolate to a tag and tied that to a knife and fork. It all came up lovely and shiny, ready for the wedding. I also gave a few other pieces a good soaking like cake slices and a silverware egg cup that belonged to my husband’s late father. This is a really good tip to know should you have any silverware needing cleaning and you can do it without any harmful cleaning fluids and everyone should have baking soda and vinegar in their home. Hope you give it a try.

Tuesdays with a Twist Featured

Friday, March 13, 2015

Cleaning your home, the old fashioned way


Most of you who know me would know that I'm a home cook, Mum of two young children and try to live within my means and as frugally as possible. I make everything from scratch, buy secondhand or pick up free things as much as I can and try to live the way my Mum and grandmothers did. Both my maternal and paternal grandmothers lived well into their 90's and they lived this kind of frugal lifestyle.


You know I've shared my love of homemade cleaning products before on the blog but I was a huge lover of bleach to get that "I know it's clean now" smell. Little did I know just how much harm I was exposing myself and the kids to. (For more information on the harmful effects of bleach, this article at Sustainable Baby Steps.)

source
My cleaning 'cloths' consisted of old nappies and t-shirts cut up, cheap products from the dollar store and feather dusters that really only shifted the dust from one place to the next. My grandmothers wouldn't have used fancy (or harmful) cleaning products. Just natural ingredients and good old fashioned elbow grease to keep the home clean and tidy.

source

I remember my maternal Nanna only ever bathing in Sunlight soap and used the leftover soap pieces for the detergent to wash her dishes. She probably washed her clothes with Sunlight soap as well!

In December last year I was introduced to a new way of cleaning that I believe is very much like the way my grandmothers used to do it but with less elbow grease. Norwex is a company which started in Norway back in 1994. Their range of superior microfibre cloths and enzyme based cleaning products keep nasty, harmful chemicals out of the home while saving you time, money and the environment. My grandmothers probably saved a lot of money not spending money on chemicals which also, in turn, saved the environment but their days started from sun up until well into the night, keeping the home clean, cooking from scratch, mending worn clothes and looking after their husbands and children. Norwex cuts down on the 'elbow grease'. The superior microfibre products do all the hard work for you along with just water and, sometimes, the natural, enzyme based products to help you keep on top of those really difficult cleaning jobs like the oven, bathroom and carpets, for example.


I'm so passionate about this way of cleaning. Who would've thought you could clean your house with just water? I'm sure my grandmothers were onto it and would've been advocates to the Norwex way of cleaning if it were around in their day. Norwex's global mission is to improve quality of life by radically reducing chemicals in the home. I'd love to share my passion with you and come and demonstrate just how wonderful these products are. Please drop me a line via email (domesblissity at gmail dot com) or via my direct business page for more information. You owe it to yourself and your family. Imagine the extra money you'll have in your pocket not having to spend heaps on cleaning products and the extra time you'll have to spend on yourself and with your family.


Disclaimer:  I am a Norwex Business Consultant. I was not paid for this post. These are my own personal opinions.


Thursday, March 12, 2015

Cleaning your home, the old fashioned way

Most of you who know me would know that I’m a home cook, Mum of two young children and try to live within my means and as frugally as possible. I make everything from scratch, buy secondhand or pick up free things as much as I can and try to live the way my Mum and grandmothers did. Both my maternal and paternal grandmothers lived well into their 90’s and they lived this kind of frugal lifestyle.

You know I’ve shared my love of homemade cleaning products before on the blog but I was a huge lover of bleach to get that “I know it’s clean now” smell. Little did I know just how much harm I was exposing myself and the kids to. (For more information on the harmful effects of bleach, this article at Sustainable Baby Steps.)

source

My cleaning ‘cloths’ consisted of old nappies and t-shirts cut up, cheap products from the dollar store and feather dusters that really only shifted the dust from one place to the next. My grandmothers wouldn’t have used fancy (or harmful) cleaning products. Just natural ingredients and good old fashioned elbow grease to keep the home clean and tidy.

source
I remember my maternal Nanna only ever bathing in Sunlight soap and used the leftover soap pieces for the detergent to wash her dishes. She probably washed her clothes with Sunlight soap as well!

In December last year I was introduced to a new way of cleaning that I believe is very much like the way my grandmothers used to do it but with less elbow grease. Norwex is a company which started in Norway back in 1994. Their range of superior microfibre cloths and enzyme based cleaning products keep nasty, harmful chemicals out of the home while saving you time, money and the environment. My grandmothers probably saved a lot of money not spending money on chemicals which also, in turn, saved the environment but their days started from sun up until well into the night, keeping the home clean, cooking from scratch, mending worn clothes and looking after their husbands and children. Norwex cuts down on the ‘elbow grease’. The superior microfibre products do all the hard work for you along with just water and, sometimes, the natural, enzyme based products to help you keep on top of those really difficult cleaning jobs like the oven, bathroom and carpets, for example.

I’m so passionate about this way of cleaning. Who would’ve thought you could clean your house with just water? I’m sure my grandmothers were onto it and would’ve been advocates to the Norwex way of cleaning if it were around in their day. Norwex’s global mission is to improve quality of life by radically reducing chemicals in the home. I’d love to share my passion with you and come and demonstrate just how wonderful these products are. Please drop me a line via email (domesblissity at gmail dot com) or via my direct business page for more information. You owe it to yourself and your family. Imagine the extra money you’ll have in your pocket not having to spend heaps on cleaning products and the extra time you’ll have to spend on yourself and with your family.

Disclaimer:  I am a Norwex Business Consultant. I was not paid for this post. These are my own personal opinions.