Showing posts with label Garden. Show all posts

Wednesday, October 3, 2018

Garden Sheds and How to Know What Type to Choose

According to an annual survey conducted by the National Gardening Market Research Company in 2015, more people spent their money on gardening that year compared to the previous one. This only means that gardening has been experiencing a resurgence, as it is only natural for some people to want to do something using their hands. You might be into gardening as well – though you’ve noticed that there’s one important thing missing in your garden: a shed where you can store all your gardening tools in one place. With a lot of garden sheds to choose from, how would you know which one is right for you? You’ll want to ask yourself the following.

Garden Sheds and How to Know What Type to Choose www.domesblissity.com

How much is your allotted budget for a garden shed?

Money usually trumps everything else as a factor in deciding which garden shed to buy for your backyard. If money isn’t much of an object to you, you could go for either a wooden or metal garden shed. Otherwise, you’ll want to opt for a plastic garden shed instead – though the next question to ask yourself might make you think twice about buying one.

How durable would you want your garden shed to be?

The allure of affordability that a plastic garden shed has to offer unfortunately comes at the expense of durability. The appearance of a typical plastic garden shed can easily wear down over time. An initially good-looking plastic garden shed can turn decrepit faster than you can harvest the rewards of your gardening hobby.

A wooden garden shed may look more rustic if you’re into anything vintage. But like those made of plastic, a wooden garden shed can also easily degrade over time, especially if you’re living in an area where it rains a lot. A couple of problems that you’ll have to deal with once you install a wooden garden shed in your backyard include warping and rotting.

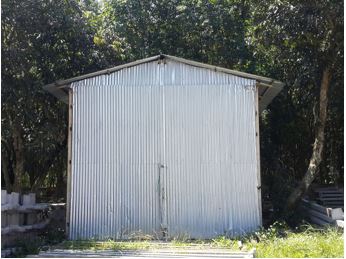
Thus, if you want your garden shed to last a long time, you should choose one that’s made of metal and doesn’t easily corrode.

How much time are you willing to spend on your garden shed upkeep?

Plastic garden sheds aren’t generally built for long-term use, so maintaining one is out of the question.
Garden Sheds and How to Know What Type to Choose www.domesblissity.com

On the other hand, you’ll have the unfortunate task of dealing with pests should you choose to install a wooden garden shed in your backyard. You might even find yourself getting rid of termites and other bugs in your wooden garden shed instead of doing actual gardening.

So if you want to spend less time maintaining your garden shed, you should set up a metal one. Even if your metal garden shed gets its fair share of dents from time to time, you can easily fix those and still take care of gardening afterward.

All of your gardening tools scattered outside of your house are a ghastly sight to behold, not to mention that you can very easily lose any one of them that way. That’s why you need to have a shed where you can organize and safely store gardening equipment. But whether you plan to buy garden sheds online or build one from scratch, figuring out which one to set up in your backyard can prove to be difficult. The above-listed things will help you know as to which type of garden shed to choose and should make setting one up easier so that you can spend more time tending to your plants instead of fussing over some storage for your gardening tools.

Tuesday, October 6, 2015

Outdoor furniture makeover with hessian (burlap) cushions


One good thing about my new husband and I is that we love a bargain especially if it's free. He's right into recycling and making do like I am and if we see something put out on the side of the road, we'll grab it like the above 2 outdoor chairs.


We have a lot of little outdoor spaces that we like to sit at all year round so we had enough chairs but when I saw these 2 (2 of 6), I grabbed them. I didn't take the chair pads because they were in pretty poor condition and beyond saving.


We had major drainage works completed at the side of the house earlier this year and there was quite a mess left. Damien decided to make this little paved area reusing pavers we already had so we needed a couple of chairs so the finding the above two was perfect timing. This area down the side of the house is really warm and sunny in the morning so perfect for cold winter mornings and in complete shade by midday so perfect for hot summer days in the afternoon.


Damien gave the chairs a spray of black paint with paint we already had. Being a couple weeks out from the wedding, my first reaction was to go and buy some chair pads but I really couldn't justify the cost. My second choice was to buy some fade resistant fabric from the store and make some cushions but have you seen the price of that per metre? I wondered what I could use from my stash that would hold up to the weather. I was also wondering what I could use for the cushions and then I had a light bulb moment.


I have quite a few cushion inserts and pillows so I thought I could use them. They were exactly the same size as the chair but I thought I could disguise it by making the fabric a little bit bigger.


Then my brain went into overdrive and I remembered I had a few hessian (burlap) sacks in my stash for various crafts and they would be just perfect. When I measured the width and total length of the chair it was going to be a little bit short lengthwise and a little bit longer on the width. I didn't want to cut the hessian as it has a tendency to unravel so I just sewed in to fit. I also needed 20 centimetres of fabric because the hessian bag was just that little bit short and I really didn't have anything appropriate in my fabric stash until I remembered I had 1 black pillow case in the linen cupboard which probably wasn't going to be used for it's intended purpose and it worked out well for the extra 20 centemetres required for the length of the chair pad plus ties to tie it onto the chair.


After cutting the black fabric to size, sew onto the opening of the hessian sack which has been sewn in to fit the width of the chair.


Turn right side out ready for sewing ties on.


You'll need 6 ties per chair, two at the top, two at the middle and two at the front of the chair pad. Sew strips of black fabric and turn right side out. Insert open seam on ends into itself and sew to close.


Give the hessian sacks a bit of a press with a hot iron, ready for sewing the black ties onto.


I thought I'd get a little bit creative with the chair cushions and make a stencil with the word "CHILL" on it just for the sake of it. This was just typed up in Microsoft Word and using a Stanley knife cut out the letters.


Place on the hessian and mark out the letters with a permanent marker.


Colour in and finish with a full stop (which is just a circle). Make sure you have an old piece of card or paper underneath or the permanent marker will come through on the other side.


I toyed with the idea of making removable cushions but I just couldn't be bothered. I have quite a large washing machine so they would fit in there or a good scrub with a scrubbing brush and some soapy water would clean them with a rinse off with the hose. Once you've sewn the ties on in place, insert the chair seat cushion and sew into place.


Insert the cushion for the chair back and pin the top opening ready for sewing. It can be a little cumbersome with the cushions inserted but by taking my time and persevering, they worked out okay. It was a quick afternoon job and I didn't have to spend a cent. (Although technically I bought the hessian sacks some time ago, the black paint and cushion inserts, it's all about using what you've already got.)


So there you have it. Two outdoor chairs for our newly created outdoor space that didn't cost a thing. This space came in very handy on the wedding day because it was a great space to just 'chill out'.


They may not fit 100% or look professional like the store bought ones but they do the job and they're individual which is what I like. Next job is to paint the house and the fence. Slowly but surely we're getting through all the things on the to do list.

PS I must've been baking on this particular day and had greasy fingers which marked the camera lens.

Monday, October 5, 2015

Outdoor furniture makeover with hessian (burlap) cushions

One good thing about my new husband and I is that we love a bargain especially if it’s free. He’s right into recycling and making do like I am and if we see something put out on the side of the road, we’ll grab it like the above 2 outdoor chairs.

We have a lot of little outdoor spaces that we like to sit at all year round so we had enough chairs but when I saw these 2 (2 of 6), I grabbed them. I didn’t take the chair pads because they were in pretty poor condition and beyond saving.

We had major drainage works completed at the side of the house earlier this year and there was quite a mess left. Damien decided to make this little paved area reusing pavers we already had so we needed a couple of chairs so the finding the above two was perfect timing. This area down the side of the house is really warm and sunny in the morning so perfect for cold winter mornings and in complete shade by midday so perfect for hot summer days in the afternoon.

Outdoor Furniture Makeover

Damien gave the chairs a spray of black paint with paint we already had. Being a couple weeks out from the wedding, my first reaction was to go and buy some chair pads but I really couldn’t justify the cost. My second choice was to buy some fade resistant fabric from the store and make some cushions but have you seen the price of that per metre? I wondered what I could use from my stash that would hold up to the weather. I was also wondering what I could use for the cushions and then I had a light bulb moment.

I have quite a few cushion inserts and pillows so I thought I could use them. They were exactly the same size as the chair but I thought I could disguise it by making the fabric a little bit bigger.

Then my brain went into overdrive and I remembered I had a few hessian (burlap) sacks in my stash for various crafts and they would be just perfect. When I measured the width and total length of the chair it was going to be a little bit short lengthwise and a little bit longer on the width. I didn’t want to cut the hessian as it has a tendency to unravel so I just sewed in to fit. I also needed 20 centimetres of fabric because the hessian bag was just that little bit short and I really didn’t have anything appropriate in my fabric stash until I remembered I had 1 black pillow case in the linen cupboard which probably wasn’t going to be used for it’s intended purpose and it worked out well for the extra 20 centemetres https://theleafsnation.com/account/ required for the length of the chair pad plus ties to tie it onto the chair.

After cutting the black fabric to size, sew onto the opening of the hessian sack which has been sewn in to fit the width of the chair.

Turn right side out ready for sewing ties on.

You’ll need 6 ties per chair, two at the top, two at the middle and two at the front of the chair pad. Sew strips of black fabric and turn right side out. Insert open seam on ends into itself and sew to close.

Give the hessian sacks a bit of a press with a hot iron, ready for sewing the black ties onto.

I thought I’d get a little bit creative with the chair cushions and make a stencil with the word “CHILL” on it just for the sake of it. This was just typed up in Microsoft Word and using a Stanley knife cut out the letters.

Place on the hessian and mark out the letters with a permanent marker.

Colour in and finish with a full stop (which is just a circle). Make sure you have an old piece of card or paper underneath or the permanent marker will come through on the other side.

I toyed with the idea of making removable cushions but I just couldn’t be bothered. I have quite a large washing machine so they would fit in there or a good scrub with a scrubbing brush and some soapy water would clean them with a rinse off with the hose. Once you’ve sewn the ties on in place, insert the chair seat cushion and sew into place.

Insert the cushion for the chair back and pin the top opening ready for sewing. It can be a little cumbersome with the cushions inserted but by taking my time and persevering, they worked out okay. It was a quick afternoon job and I didn’t have to spend a cent. (Although technically I bought the hessian sacks some time ago, the black paint and cushion inserts, it’s all about using what you’ve already got.)

So there you have it. Two outdoor chairs for our newly created outdoor space that didn’t cost a thing. This space came in very handy on the wedding day because it was a great space to just ‘chill out’.

They may not fit 100% or look professional like the store bought ones but they do the job and they’re individual which is what I like. Next job is to paint the house and the fence. Slowly but surely we’re getting through all the things on the to do list.

PS I must’ve been baking on this particular day and had greasy fingers which marked the camera lens.

Monday, April 13, 2015

Grow your own plants for your wedding


With more than 12 months still to go until I get married in May 2016, the wedding planning merry-go-round is well and truly at full speed and not about to stop. It's like I can't get off. I'm trying though. We've booked the photographer and the caterer and about to meet the marriage celebrant this coming week and once that's done, I'm going to try my hardest not to look at anything wedding related, that is, until I had this idea.

source
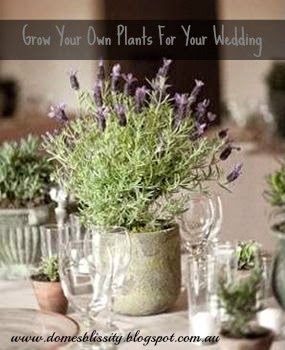
I'd been looking at bouquets, florists, real flowers, fake flowers, silk flowers etc etc etc and it just becomes mind boggling. I've always loved lavender, in every form, and want to go with something simple. I figured, when the time was right, I could enquire at a wholesale flower market as to how much it cost and then I thought, why don't I just grow my own? I can buy some already established potted plants from the nursery and nurture them until the wedding. I can use some of the pots directly on the table and use another bigger pot as my cut flowers. As we're already in autumn and coming into winter, I may have missed the boat but because I live in a warm climate I might be lucky.

source
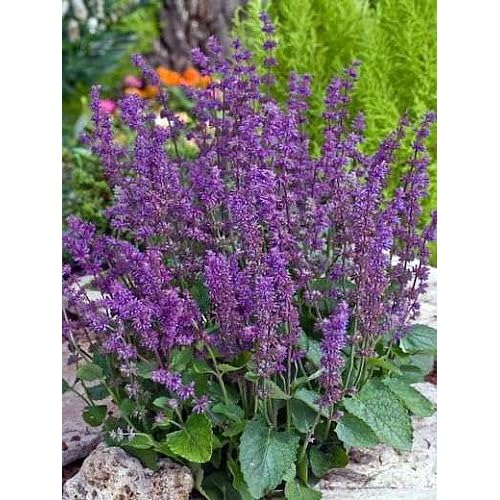
Blue salvias are another favourite of mine and are so hardy in my sub tropical climate and so easy to grow. There are many different varieties, annuals or perennials, so finding the right one for the right time of the year to harvest them for your wedding will be crucial.

The Easiest Indoor Plants That Won't Die On You -Areca Palm grows to 7ft or can be stunted by keeping in smaller pot, likes indierct sunlight and dryish soil watering only on alternate weeks .
source
And as you would imagine, I'll be styling the wedding myself, cutting corners and expenses at every possible opportunity and I have many potted palms and other plants which I'll use for decorating the reception area (which is being held at home).

Beautiful White Rose Bouquet! Photography by lifeandlovestudio.com, Floral Design by 57treasury.com
source
Of course, if you'd like to have full on roses in your bouquet you might have to rethink growing them yourself or if you're trying to cut costs, maybe think of an alternative. I've been reading that some of the silk varieties in a lot of different species of flowers are very realistic. Don't think I'll go down that path but a lot of people have and they look beautiful. 

My Daughter's Vintage Wedding: Decorations and Floral Design | BlogHer love vintage and simple!!
source
Gypsophila (or Baby's Breath as it's also known) is also very easy to grow. I love the simplicity of the plain white small flowers in the above bouquet and might use them for my attendants.

Whatever flowers you have in mind for your bridal bouquet and other flowers for attendants, think about growing them yourself to save money. Just think how much more sentimental it will be on the day. I'll be sharing how to make your own bouquet as the time gets closer because I've already looked in to that as well. (Promise, no more looking at wedding stuff for at least a couple months. Well, I'll try. It's so hard not to.)

Sunday, April 12, 2015

Grow your own plants for your wedding

With more than 12 months still to go until I get married in May 2016, the wedding planning merry-go-round is well and truly at full speed and not about to stop. It’s like I can’t get off. I’m trying though. We’ve booked the photographer and the caterer and about to meet the marriage celebrant this coming week and once that’s done, I’m going to try my hardest not to look at anything wedding related, that is, until I had this idea.

source

I’d been looking at bouquets, florists, real flowers, fake flowers, silk flowers etc etc etc and it just becomes mind boggling. I’ve always loved lavender, in every form, and want to go with something simple. I figured, when the time was right, I could enquire at a wholesale flower market as to how much it cost and then I thought, why don’t I just grow my own? I can buy some already established potted plants from the nursery and nurture them until the wedding. I can use some of the pots directly on the table and use another bigger pot as my cut flowers. As we’re already in autumn and coming into winter, I may have missed the boat but because I live in a warm climate I might be lucky.

source

Blue salvias are another favourite of mine and are so hardy in my sub tropical climate and so easy to grow. There are many different varieties, annuals or perennials, so finding the right one for the right http://www.mudboggerforum.com/profile/4837061 time of the year to harvest them for your wedding will be crucial.

The Easiest Indoor Plants That Won't Die On You -Areca Palm grows to 7ft or can be stunted by keeping in smaller pot, likes indierct sunlight and dryish soil watering only on alternate weeks .
source

And as you would imagine, I’ll be styling the wedding myself, cutting corners and expenses at every possible opportunity and I have many potted palms and other plants which I’ll use for decorating the reception area (which is being held at home).

Beautiful White Rose Bouquet! Photography by lifeandlovestudio.com, Floral Design by 57treasury.com
source
Of course, if you’d like to have full on roses in your bouquet you might have to rethink growing them yourself or if you’re trying to cut costs, maybe think of an alternative. I’ve been reading that some of the silk varieties in a lot of different species of flowers are very realistic. Don’t think I’ll go down that path but a lot of people have and they look beautiful. 
My Daughter's Vintage Wedding: Decorations and Floral Design | BlogHer love vintage and simple!!
source
Gypsophila (or Baby’s Breath as it’s also known) is also very easy to grow. I love the simplicity of the plain white small flowers in the above bouquet and might use them for my attendants.
Whatever flowers you have in mind for your bridal bouquet and other flowers for attendants, think about growing them yourself to save money. Just think how much more sentimental it will be on the day. I’ll be sharing how to make your own bouquet as the time gets closer because I’ve already looked in to that as well. (Promise, no more looking at wedding stuff for at least a couple months. Well, I’ll try. It’s so hard not to.)