

One good thing about my new husband and I is that we love a bargain especially if it’s free. He’s right into recycling and making do like I am and if we see something put out on the side of the road, we’ll grab it like the above 2 outdoor chairs.

We have a lot of little outdoor spaces that we like to sit at all year round so we had enough chairs but when I saw these 2 (2 of 6), I grabbed them. I didn’t take the chair pads because they were in pretty poor condition and beyond saving.

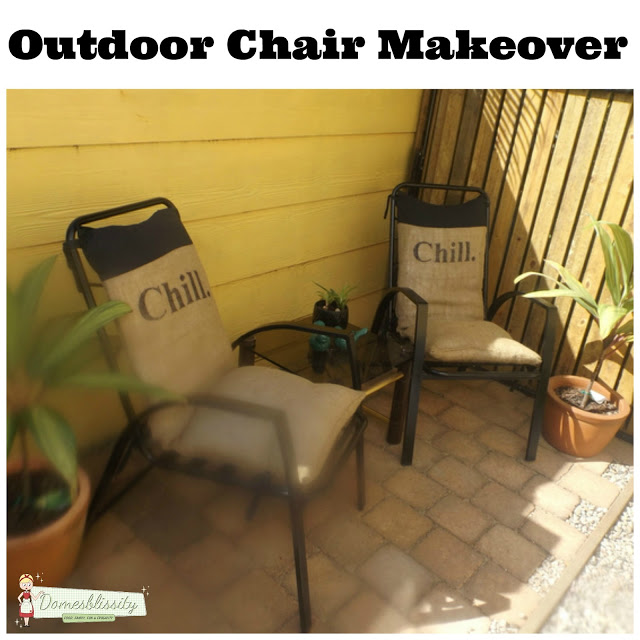
We had major drainage works completed at the side of the house earlier this year and there was quite a mess left. Damien decided to make this little paved area reusing pavers we already had so we needed a couple of chairs so the finding the above two was perfect timing. This area down the side of the house is really warm and sunny in the morning so perfect for cold winter mornings and in complete shade by midday so perfect for hot summer days in the afternoon.

Outdoor Furniture Makeover

I have quite a few cushion inserts and pillows so I thought I could use them. They were exactly the same size as the chair but I thought I could disguise it by making the fabric a little bit bigger.

Then my brain went into overdrive and I remembered I had a few hessian (burlap) sacks in my stash for various crafts and they would be just perfect. When I measured the width and total length of the chair it was going to be a little bit short lengthwise and a little bit longer on the width. I didn’t want to cut the hessian as it has a tendency to unravel so I just sewed in to fit. I also needed 20 centimetres of fabric because the hessian bag was just that little bit short and I really didn’t have anything appropriate in my fabric stash until I remembered I had 1 black pillow case in the linen cupboard which probably wasn’t going to be used for it’s intended purpose and it worked out well for the extra 20 centemetres https://theleafsnation.com/account/ required for the length of the chair pad plus ties to tie it onto the chair.

After cutting the black fabric to size, sew onto the opening of the hessian sack which has been sewn in to fit the width of the chair.

Turn right side out ready for sewing ties on.


You’ll need 6 ties per chair, two at the top, two at the middle and two at the front of the chair pad. Sew strips of black fabric and turn right side out. Insert open seam on ends into itself and sew to close.

Give the hessian sacks a bit of a press with a hot iron, ready for sewing the black ties onto.

I thought I’d get a little bit creative with the chair cushions and make a stencil with the word “CHILL” on it just for the sake of it. This was just typed up in Microsoft Word and using a Stanley knife cut out the letters.

Place on the hessian and mark out the letters with a permanent marker.

Colour in and finish with a full stop (which is just a circle). Make sure you have an old piece of card or paper underneath or the permanent marker will come through on the other side.

I toyed with the idea of making removable cushions but I just couldn’t be bothered. I have quite a large washing machine so they would fit in there or a good scrub with a scrubbing brush and some soapy water would clean them with a rinse off with the hose. Once you’ve sewn the ties on in place, insert the chair seat cushion and sew into place.

Insert the cushion for the chair back and pin the top opening ready for sewing. It can be a little cumbersome with the cushions inserted but by taking my time and persevering, they worked out okay. It was a quick afternoon job and I didn’t have to spend a cent. (Although technically I bought the hessian sacks some time ago, the black paint and cushion inserts, it’s all about using what you’ve already got.)

So there you have it. Two outdoor chairs for our newly created outdoor space that didn’t cost a thing. This space came in very handy on the wedding day because it was a great space to just ‘chill out’.

They may not fit 100% or look professional like the store bought ones but they do the job and they’re individual which is what I like. Next job is to paint the house and the fence. Slowly but surely we’re getting through all the things on the to do list.
PS I must’ve been baking on this particular day and had greasy fingers which marked the camera lens.


How wonderful you d found your match with someone who likes to be thrifty and smart about things. You've done a wonderful jobs with the chairs, and I love how simple it was doing the stencil with a permanent marker.
Anne, you are SO clever – those chairs look GREAT!!
Hi Anne,
You are just so talented and creative. I love those chair covers you made!
You did a great job and you saved money too.
Thanks for sharing this at Cooking and Crafting with J & J.
Enjoy the week.
Julie
Oh gosh…love how this turned out!
Thanks for joining Cooking and Crafting with J & J!
This is such a cute little patio setup, and those chairs turned out amazing!!
Aww thanks Iris. Thanks for letting me know.
Anne xx