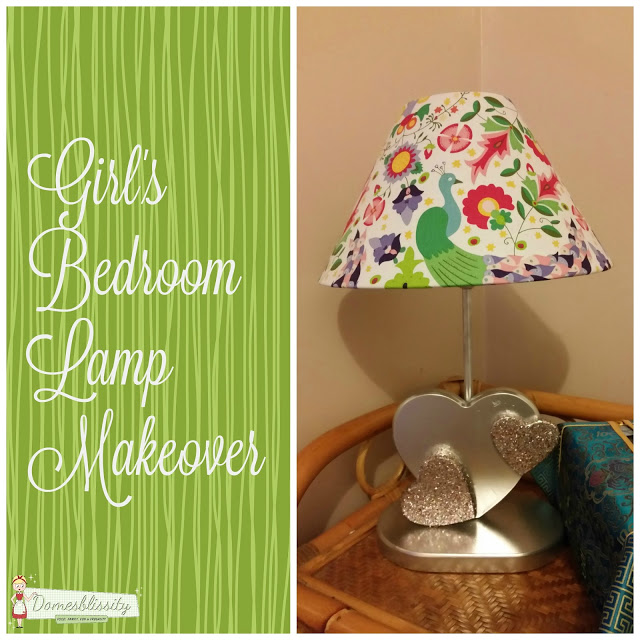

I’ve never been one much for decorating my kid’s bedrooms in character themes, oh except for a Snoopy theme for both a girl’s and boy’s nursery and then there was my son’s obsession with Disney’s “Cars” which lasted for about 6 years. Other than that their bedrooms have been a hotchpotch of colours and designs, just practical furniture and decorations. I decided to give their rooms a makeover and my daughter wants a ‘peacock’ themed bedroom (of all things) so I’ve set about reusing what I’ve already got which started with this lamp.

The Barbie lamp I picked up from a thrift store a few years ago. With our humid climate and the accumulation of dust, the shade on this lamp was quite dirty and now that my daughter’s turned 11, she’s a little bit over the Barbie lamp (even though she still plays with her Barbies).

I started out by unscrewing the bulb and taking off the lampshade. When I removed the fabric from the lampshade I noticed the bottom ring wasn’t attached so I was on the lookout for a small lampshade from the op shop on my next visit.

I picked up this one for $2 and it was in excellent condition. I could go straight over the lampshade with the fabric I had chosen.

The next step is to create a template to cut out the fabric. I’ve recovered quite a few lampshades over the years and it really is quite easy. I use newspaper. Lie the lampshade on it’s side and line up the seam of the lampshade with a small mark on the newspaper as indicated by the arrows. Slowly turn the lampshade around and as you do, mark both the outside circle and smaller inside circle on the newspaper.

What you’ll end up with is a semi circle with a smaller semi circle cut out at the top.

Place it on the lampshade just to check that it’s the right size.

I picked up a fat quarter of this
really cute peacock themed fabric in bright colours from ebay for a couple dollars. You don’t really need much fabric. I’ve got a bit leftover for my fabric stash which will come in handy for something, I’m sure. Make sure it is ironed before you cut it to remove any creases.

Pin the template onto the fabric.

Cut out the fabric with at least a 1cm (1/2 inch) seam allowance.

Place the fabric on the lampshade to make sure it will fit. You can trim any excess once it’s stuck in place. You can use craft glue or spray adhesive. I find spray adhesive is the best for this kind of job.

Carefully place the fabric onto the lampshade, smoothing out any lumps as you go. Glue together the edges of the fabric with a line of craft glue.

Nick small cuts into the top edge opening of the lampshade’s fabric so it sits flush. Stick fabric down to the lampshade with a bead of glue on both the top and bottom.

And that’s it! You’re done.

I had planned on spray painting it white but we were all out. We did have silver spray paint and I’m quite happy with the way it turned out. I glued glitter to the wooden hearts on the lamp. I should’ve sanded it first because I didn’t realise how scratched it was. I guess you can’t notice it too much.

So there you have it. I’m sure when the next bedroom makeover is due, it will be spray painted in a different colour and a different fabric used. That’s the beauty of reusing and recovering old lampshades. You can make it look however you like.

(Please note the yellow light bulb. I understand that’s to deter any bugs because heaven help us all if there’s a bug in her bedroom!)


Stay tuned for more budget bedroom makeover ideas and the final reveal of my daughter’s bedroom.


This definitely is so adorable! 🙂
Thanks for joining Cooking and Crafting with J & J!
Thanks Jess!
Anne xx
I love how you have revitalised this lamp, Anne! It looks beautiful. It’s so nice to see things being re- designed instead of simply thrown away. Thank you for sharing this tutorial with us at the Hearth and Soul Hop. I hope it will encourage others to have a go at revitalising things instead of just throwing them away! You’ve done a wonderful job here! Shared.
Thank you so much April. I appreciate it the share.
Anne xx
Adorable!!! Could be adapted to any space.
Thanks for sharing at Funtastic Friday!
Thanks Chris!
What an AWESOME makeover, Anne!! You are brilliant. Love the fabric too, and I can’t wait to see how her “peacock room” turns out! Thanks so much for linking up at Friday Frivolity — come back soon! 😀
Thanks so much Sarah. I just need to hang some pictures and I’m waiting on a peacock themed cushion cover to arrive in the post and I’ll be good to go. Thanks for your comment.
Anne xx
This is gorgeous! A perfect transformation, too 🙂 Thanks so much for sharing your ideas with us at Funtastic Friday. Hope to see you again at this week’s party.